Nights draw in, rooms feel smaller, and tiny wall scars start to shout. A wobbly socket can be the loudest.
Across the UK, households face the same irritation: crumbling plasterboard around a socket that catches the eye and snags the paint roller. You do not need to strip a whole wall to put it right. A lean, localised repair restores strength, keeps costs low, and leaves a clean finish you can paint the same week.
Why the area around your socket fails
Plasterboard edges can crumble when faceplate screws crush the board. Knocks from hoovers, furniture, and suitcases compound the damage. Moisture softens board fibres near cold external walls. Poor initial cut-outs leave weak, ragged edges. A loose back box allows the faceplate to flex, which accelerates cracking.
Kill power at the consumer unit and verify dead at the socket with a voltage tester before any work near live conductors.
If the faceplate looks heat-stained or smells acrid, stop. A burned outlet needs an electrician. If the board disintegrates when pressed, plan a patch rather than a smear of filler.
What you need and what it costs
You can complete a tidy repair with basic kit and one small offcut of board. Many homes already hold half of this list.
- Voltage tester and insulated screwdriver
- Sharp utility knife or plasterboard saw and a metal rule
- Small plasterboard offcut, 12.5 mm thickness for most walls
- Two timber or plasterboard backing strips (about 25 x 200 mm)
- Jointing compound and paper or fibre joint tape
- Adhesive suitable for plasterboard, or screws for the backing strips
- Fine sanding block, dust sheet, and a vacuum
- Primer/undercoat and matching wall paint
A careful DIY patch typically costs under £30 in materials and takes about 75–120 minutes of hands-on time, plus drying.
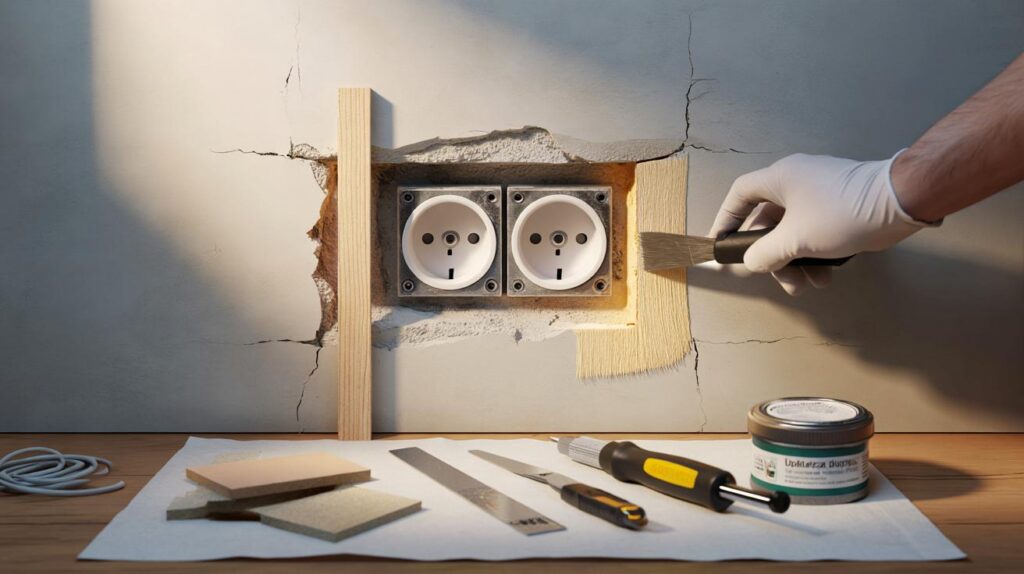
The lean repair method: cut, patch, blend
Safe isolation and strip-down
Switch off the relevant circuit at the consumer unit. Check the socket is dead with a tester. Remove the faceplate screws and ease the plate forward. Keep wires in place and supported. If slack allows, gently pull the plate clear and tape the terminal ends to prevent strain.
Square up the damage
Score a neat rectangle around the crumbled section with a metal rule as a guide. Keep clear of the back box and cables. Cut only to a depth that clears the outer board. Remove the damaged piece cleanly. Scrape back to sound, firm plasterboard. Vacuum dust so tapes and compounds bond well.
Install backing so the patch cannot sink
Feed a slim backing strip behind the opening and centre it. Hold it tight to the rear of the board. Fix it with two drywall screws through the existing board, one at each end. Repeat at the opposite side to create a ledge for the new patch. Adhesive alone can work on small holes, but backing gives resilience and prevents a hollow spot.
Cut and fit a tight patch
Measure the opening to the millimetre. Transfer the size to your offcut. Score and snap the new piece. Test the fit without force. The patch should sit flush with the surrounding surface. Adjust edges with the knife until the seam line is tidy and consistent. Fix the patch to the backing with screws or a dab of adhesive, ensuring it sits level with the wall.
Tape, joint, and feather
Apply a thin bed of joint compound over all seams. Lay paper or fibre tape into the wet compound, press out air, and cover with a skim. Let it set. Apply a wider second coat that extends 50–70 mm beyond the first. Sand lightly after drying. A third, broader skim removes the last shadow of a ridge and blends to the existing paint film.
Prime, paint, and refit
Vacuum dust, then prime the new joint so topcoat colour matches. Apply two thin coats of wall paint. Refit the faceplate once paint is dry and the compound has fully set. Nip the screws up until snug. Do not crush the board.
Do not over-tighten the faceplate screws. Compression at the edges causes hairline cracks that creep back within weeks.
When you should call a professional
Leave it to a qualified electrician if you see heat damage, brittle insulation, or loose terminals. A sunken or broken metal back box needs expert replacement. Heavy damp, recurring mould, or a water stain signals a leak or cold-bridge problem. Lath-and-plaster walls require a different approach and specialist fixings. Tenants should check the tenancy agreement before altering electrical accessories.
Costs and time at a glance
| Option | Typical outlay | Hands-on time | Notes |
|---|---|---|---|
| Local DIY patch | £20–£45 | 75–120 minutes + drying | Strong result with backing strips and three-coat jointing |
| Reboard and skim full wall | £150–£400 | 1–2 days | Overkill for small, localised damage near a socket |
| Electrician visit + making good | £80–£150 + materials | 1–3 hours | Choose this if wiring or the back box is compromised |
Smart prevention that saves you repainting
- Use faceplate spacers if the board sits slightly proud or the box is recessed. This stops flex and cracking.
- Pick a slightly oversized faceplate or a neat pattress to shield vulnerable edges from knocks.
- Keep screws finger-tight plus a quarter turn. The faceplate should not dish the plasterboard.
- Seal external wall gaps and address condensation to protect board fibres from softening.
- Review heavy furniture routes so vacuums and boxes do not clip sockets during moves.
What changes if the socket sits in masonry, or on a stud wall
A masonry back box set in brick often leaves crisp edges. Chips usually repair with filler alone. A stud wall relies on the plasterboard for faceplate support, so a rigid patch and backing strips make a lasting difference. If the cut-out is oversized, use repair clips or a new adjustable dry lining box to grip the board securely.
Key checks before you switch the power back on
Confirm the faceplate sits flat, with no rocking. Verify no copper shows at the terminals. Check that the back box earth is present where required. Restore power and test with a plug-in tester. Heat, buzzing, or a smell means switch off and book an electrician.
Cut back to sound board, support the patch, and blend the joint over three coats. Shortcuts reappear as cracks.
Extra context you can use this week
Jointing compound types behave differently. Ready-mixed sands easily but dries slower. Powder sets faster and allows two coats in one day. Paper tape resists cracks better across butt joints than mesh. On a small patch near a socket, a combination works well: paper over the longest seam, mesh around corners.
If noise transfer bothers you, consider a denser patch. A sliver of acoustic plasterboard in the same thickness adds mass. It costs a little more but reduces socket-to-room transmission. If you plan to repaint the whole wall soon, tint a small sample pot to your exact shade now to blend the repair, then keep notes of brand, finish, and batch for later rooms.


Tried this tonight—cut, patch, blend—took me ~75 mins and cost £26.84. Looks miles better. Only thing I’d add: don’t overtighten the faceplate (learnt the hard way last time!). Cheers.
Genuine question: is it really safe to leave the conductors taped while you work? My consumer unit is ancient and I’m paranoid. Shouldn’t this be a “get an elecrician” if wires are short/tight?