Your lower back aches after another long day at the laptop, and the idea of yet another appointment feels exhausting. A simple cylinder of foam sits in the corner, ignored and slightly dusty. What if that’s the quiet fix your spine’s been asking for — not a miracle, just the right pressure in the right place, at the right pace?
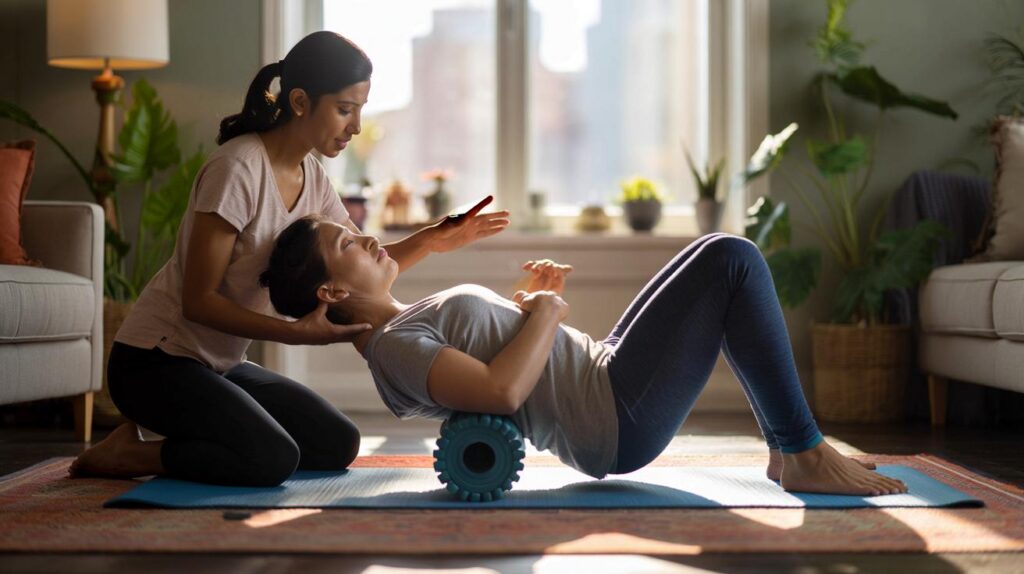
The coach arrived with a foam roller tucked under one arm and a soft voice that didn’t pretend. She asked me to sit on the living-room rug, socks off, phone on silent, and breathe like I meant it. The city hummed outside. Inside, the only sound was the tiny crunch of the roller on carpet and a few honest winces turning into slow exhales. She didn’t start with the sore bit. She started where tension hides. Then my back began to let go, almost grudgingly. It felt like taking off a backpack I’d forgotten I was wearing. The trick was almost invisible.
The quiet crunch of a foam roller — and why your back wants it
The coach, a London trainer named Mia Patel, begins at the mid-back, not the lower back. That surprises people. She says the thoracic spine is where modern life stiffens first, and stiffness there makes your lower back work overtime. When the upper half moves better, the sore half stops shouting.
We’ve all had that moment when you stand up from the sofa and feel a hot line across your lower back. Mia sees that every day over Zoom. She has people roll the upper back in small, thoughtful passes for sixty to ninety seconds, then sit tall and breathe out longer than they breathe in. The change is quiet, like turning down a dimmer switch.
There’s a simple logic here. Foam rolling isn’t smashing knots; it’s sending calmer messages to your nervous system. Muscles stop guarding when they feel safe. The roller adds pressure, your breath adds permission. Combine both, and the spine moves as a team again. That’s why the sequence matters: upper back, sides, hips — then everything below relaxes its grip.
Step-by-step: the home routine a coach teaches in five moves
Move 1 — Upper back rolls. Place the roller across your mid-back, roughly bra-line height. Hips down to start, hands cradling your head, chin tucked. Lift your hips slightly, then roll a hand’s width up and down between the bottom of your shoulder blades and the base of your neck. Six slow passes. Keep your breath long, and let your ribs soften over the roller. Small, not dramatic.
Move 2 — T-spine extensions. Sit the roller at mid-back again, hands behind head, elbows in your peripheral vision. Inhale to lengthen the spine, then gently drape over the roller as you exhale, like your sternum is sinking towards the ceiling. Five slow breaths, then shift the roller an inch up or down and repeat. This isn’t a backbend contest — it’s a conversation with tight tissue.
Move 3 — Lats and side-body release. Lie on your side with the roller tucked just below your armpit, body at a 45-degree angle. Roll an inch or two towards your mid-rib and back again. It’s tender, so go slow and light. Switch sides after 60–90 seconds. Roll your upper back, not your lower back is Mia’s line; easing the lats stops them yanking on your spine.
Move 4 — Glutes and piriformis. Sit on the roller, hands behind you, and cross your right ankle over your left knee. Lean a little to the right and make small, slow circles high on the cheek, not on the bony edge. Breathe. Swap sides. You’ll often find a spot that “talks back” — stay on it, but only until the sting drops to a dull, curious pressure.
Move 5 — Front-of-hip reset. Lie face down with the roller under one upper thigh, just below the hip crease. Toes turned slightly in, tiny rolls up and down 8–10cm. Spend a minute per side. Tight hip flexors tug your pelvis into a tilt that makes your lower back complain. Free them, and the spine stands easier. Finish lying on the floor, calves on the roller, and take six breaths with longer exhales. This is self-care you can actually feel working.
Common mistakes, kinder fixes, and the “good pain” guide
Biggest myth: rolling your lower back helps your lower back. It often does the opposite. Those muscles are busy guarding your spine; pressing hard can make them guard more. Aim above and around the pain instead. Think 4 out of 10 pressure, not 8 out of 10 heroics. Your nervous system learns more from whispers than shouts.
Let’s be honest: nobody really does this every day. That’s fine. Two or three short sessions a week change more than a single epic blast. Follow this rhythm — five moves, two minutes each, then breathe. Keep the roller off bony landmarks, move slow, and if you feel pins and needles, sharp pain, or anything that worries you, stop. If back pain comes with leg weakness, bladder/bowel changes, or fever, speak to a clinician first.
Mia’s litmus test is simple. Do the move; within twenty seconds, the discomfort should soften, not spike. If it spikes, adjust pressure or position. Small, slow moves beat big, fast ones.
“I’m not hunting for pain,” she says. “I’m coaching your back to trust you again.”
- Breathe out longer than you breathe in — a 4-second inhale and 6-second exhale softens the guard.
- Two minutes per area is plenty; your tissues listen quickly.
- Swap a very firm roller for a medium one if you tense up.
- Breathe out longer than you breathe in to turn the volume down on tight muscles.
- If you have osteoporosis, a recent fracture, or are pregnant, get tailored guidance first.
What changes when you keep rolling
You start noticing small wins. The twist to check your blind spot feels smoother. The first sit-to-stand in the morning is less braced. Even your walk changes, with your arms swinging instead of your lower back doing the job. None of that needs a gym. Just a corner of floor, a cylinder of foam, and a plan gentle enough to repeat.
Your brain learns safety through repetition. After a week, the roller is no longer a weapon against knots but a way to practice ease: pressure, breath, move. People tell Mia they sleep better and move more during the day because their back no longer dictates the schedule. That momentum is the real medicine. And it travels well — roll, breathe, go.
| Key points | Details | Interest for reader |
|---|---|---|
| Upper back first | Free the thoracic spine and lats before touching the lower back | Less guarding, more relief where it hurts |
| Slow, small passes | 1–2cm rolls with calm breathing for 60–90 seconds | Easier to repeat, safer for sensitive spines |
| Sequence matters | Upper back → sides → glutes → front of hips → breathing | A clear routine you can follow at home in 10–12 minutes |
FAQ :
- How often should I foam roll for back pain?Two to three short sessions per week works well for most people. Aim for 10–12 minutes total. Keep it light enough that you’d happily do it again tomorrow.
- Should I roll my lower back directly?No. Target the upper back, lats, glutes, and hip flexors instead. The lower back usually eases once the surrounding areas relax.
- What kind of roller is best?A medium-density foam roller is a solid start. If you tense against pressure, choose a softer one. Spiky textures aren’t necessary for relief.
- How long until I feel relief?Many feel easier within minutes, especially after upper back and glute work. Longer-lasting change tends to show up after a week of consistent sessions.
- Who should avoid foam rolling?If you’ve had a recent fracture, active osteoporosis, unexplained numbness, bladder/bowel changes, or severe pain after trauma, seek clinical advice before rolling.


Tried the ‘upper back first’ idea tonight and wow—lower back eased without touching it. The small, slow passes + longer exhales felt weirdly calming. Definately keeping the 10–12 min routine; it’s the first time foam rolling hasn’t felt like a wrestling match. Thx for making the sequence so clear.