Parquet looks heroic in estate photos, less so in real life. Chairs scrape. Dogs skid. A friend pops by in stilettos and leaves a comet trail by the sofa. We’ve all had that moment when the first scratch hurts more than it should. This is a small story about someone who didn’t rip it up, didn’t call a contractor, and didn’t throw a rug over it. She picked up wood filler and got her floor back.
The morning light in Sophie’s South London flat does her no favours. It pours across the oak parquet and finds every scuff like a detective with a torch. She’d stopped seeing the pattern and started seeing the damage. A sink-white line along the hallway. A crescent near the desk. A pucker where a plant pot once leaked.
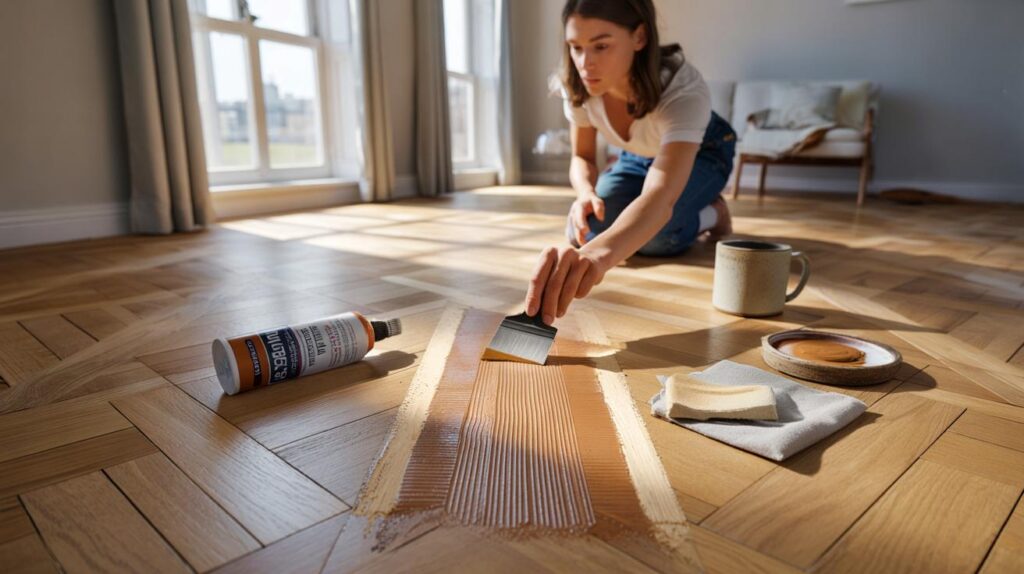
On a Saturday, armed with a mug of tea and a £7 tube of wood filler, she sat on the floor and decided to try. The plan was humble: fix the worst lines, not the whole life story. The result surprised her.
It started with one scratch. Then another.
When scratches stop shouting: the quiet power of wood filler
Scratches make bright noise on dark wood because they catch light differently. They cut across the grain, lift fibres, and leave a pale edge that the eye loves to chase. Wood filler, used with restraint, softens that contrast. Think of it as makeup for timber: you’re not rebuilding a plank, you’re blurring a scar so the pattern reads first again. Done right, the floor doesn’t look “fixed”. It just looks like itself, pre-chaos.
Sophie kept it simple and cheap. She chose a water‑based filler in a medium oak tone, practised on a spare board, and worked in a small zone by the hallway. Ten minutes to clean, five to fill, a coffee while it cured, then a gentle sand and a wipe of wax. The transformation cost **budget under £20** and took less than an episode of a Sunday drama. She didn’t chase perfection. She chased “good enough to stop glaring”. That was enough.
Why does it work? Most modern fillers bind sawdust‑fine particles with resins that cure hard, then sand to the same matte as the surrounding wood. They don’t reflect like plastic. They accept pigment, which means you can tint the repair to sit inside the floor’s tone, not hover on top. A scratch becomes a quiet line within the grain, not a white alert. When light skims the boards at 4pm, your eye reads harmony first. Relief arrives second.
How she did it: the no-drama method
She started by cleaning the scratch with a drop of washing‑up liquid in warm water and a soft cloth. Loose fibres got a quick trim with a craft blade. A tiny swipe of **light sanding** with 240‑grit smoothed frayed edges, then a vacuum and a tack cloth so the filler had clean timber to hold. She pressed a smidge of filler into the scratch with a flexible putty knife, slightly proud of the surface. Twenty to forty minutes later (check your product), she sanded level in the direction of the grain and wiped on a thin coat of wax to blend the sheen.
Colour was the make‑or‑break. She dabbed filler into the cap, mixed a dot of water‑based stain until it matched the surrounding board, and tested on a hidden corner. A hair darker is safer than a hair lighter; lighter reads as fresh damage. One more thing: skip cross‑grain sanding, keep dust off the repair, and work small. Let’s be honest: nobody really does that every day. Today, do it twice. Tomorrow, you won’t have to look at it again.
She wasn’t aiming for showroom gloss. She wanted her floor to stop interrupting her day. Small fix, big relief.
“I thought filler was for carpenters,” she laughed. “Turns out it’s for impatient people who still want their home to feel cared for. The scratch is still there if you go hunting with your nose to the floor. I don’t. I just walk through the hallway and smile.”
- Clean, dry, and de‑dust before you do anything.
- Test tone on a hidden patch, not on the scratch you care about.
- Overfill slightly; sanding brings it flush.
- Finish to match: wax on waxed floors, lacquer on lacquered floors.
- Work with the grain, not across it.
The small science of a big difference
Parquet ages in two ways: colour change in the finish, and micro‑wear in the wood. Filler helps with the second, not the first. That’s why Sophie chased the deep lines and left the honest patina. A solvent‑based filler cures harder and faster, a water‑based one blends colour more easily and smells milder. Putty often stays flexible for gaps near skirting; filler cures rigid for scratches and chips. Pick the thing that matches the job, not the trend on TikTok.
There’s also the light trick. A scratch exposes fresh, raw wood that reflects bright and cool; the surrounding finish is warmer and slightly matte. By packing that valley, sanding flush, and topping with a finish that matches sheen, you normalise reflectivity. The brain stops flagging “damage” and returns to reading the herringbone as a whole. The repair’s success lives less in colour charts and more in how the floor behaves in late‑day light by the window. That’s the test you want to pass.
Sophie learned one lesson the honest way: blending beats hiding. She used a soft cloth to feather wax beyond the repair so there wasn’t a hard ring of new sheen around old. A fingertip buff gives a better blend than a heavy hand with a brush. One more nudge: if your floor is lacquered, reach for a compatible clear coat instead of wax. If it’s oiled, a dot of maintenance oil after sanding helps the **colour match** settle in. The right finish is the final veil.
What happens after you quieten a scratch? You start noticing the good bits again. The zig‑zag of the herringbone. The knots that were always there, stubborn and proud. The way your room feels larger when your eye stops stalling on a white line by the door. It’s not about pretending the floor is new. It’s about letting it be the background that holds your day without shouting. The funny part is how contagious that feeling is — fix one mark, and you look at the rest of your home with kinder eyes. Share that. It travels.
| Key points | Details | Interest for reader |
|---|---|---|
| Choose the right filler | Water‑based blends and stains easily; solvent‑based cures harder. Putty for gaps, filler for scratches. | Pick once and avoid buying the wrong product. |
| Prep and application | Clean, trim fibres, sand lightly, overfill, cure, sand with the grain, finish to match sheen. | Followable steps with a realistic time window. |
| Colour and sheen blending | Tint slightly darker, test in a hidden spot, feather the finish beyond the repair. | Repairs vanish in normal light, not just in photos. |
FAQ :
- Can wood filler fix deep gouges in parquet?Yes, up to a point. For gouges deeper than 3–4 mm, fill in thin layers, letting each cure before the next. Missing chunks may need a sliver of wood plus filler.
- Will the repair take stain and match my floor?Many water‑based fillers accept water‑based stains. Test first. Go a touch darker and blend sheen with wax, oil or lacquer for a closer match.
- How long does wood filler take to dry?Most water‑based fillers cure to sand in 20–60 minutes for shallow fills. Solvent types can be faster. Cool rooms slow everything down.
- What’s the difference between wood filler and wood putty?Filler cures hard and is designed for bare wood repairs; putty stays pliable and is often used after finishing to plug tiny gaps near trim.
- Will the repair hold up to mopping and pets?Yes, if you top it with a finish that matches your floor. Keep mopping light and well‑wrung. Pet claws are fine once the repair is fully cured.


I was about to throw a rug over my hallway scars. Your “good enough to stop glaring” idea is genius. Quick Q: did the wax you used yellow the filler over time, or change the sheen under morning light? I’m nervous about mismathcing gloss. Also, medium oak looked spot‑on in your pics—any brand reccomendations? I’ve got an oak parquet too and a £10 budget to fix the worst offenders.