With winter bills looming, a wartime-style home tweak is quietly returning to British doorways, promising comfort most households forgot about.
Across the country, families are reviving a rubber door sweep made from bicycle inner tubes and wire, the kind older generations swore by. It strips out under-door draughts, boosts warmth, and costs less than a takeaway. The appeal feels obvious in a year of tight budgets and restless weather.
Why an old rubber strip is back
The idea surfaced a century ago, when tyres and inner tubes became common and nothing went to waste. Households cut a strip of rubber, fixed it to the bottom of a door, and slowed the cold in minutes. The principle still holds: stop air sneaking under a door and you keep heat where you paid for it.
Energy advisers say homes with leaky thresholds lose warmth fast. A one-centimetre gap under a typical front door can act like a permanent open vent. Close that route and radiators work less hard, rooms feel steadier, and thermostats stop yo-yoing.
In very draughty homes, sealing under-door gaps can shave up to 20% off heating use; many households see 5–12%.
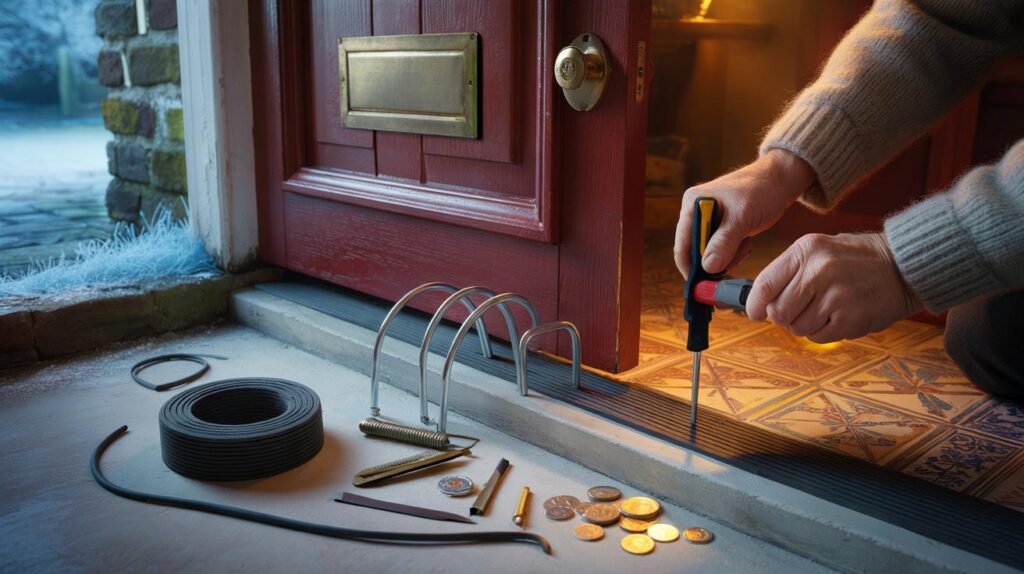
What you need
- Rubber strip, about 2–3 mm thick and cut to door width (bicycle inner tube or EPDM membrane works well)
- Galvanised steel wire, roughly 2–3 mm diameter, for two simple retaining clips
- Wood screws, 30–35 mm long, six to eight pieces
- Optional: a thick leather strip as an alternative to rubber
Picking the right rubber
Choose rubber that flexes enough to touch the floor across uneven patches yet resists tearing. EPDM handles damp thresholds and lasts for years. Inner tubes cost pennies, curve neatly against the floor, and cut easily with a utility knife. Leather looks smart indoors and glides over carpets.
Step-by-step in 30 minutes
Measure the distance between the inside door stops. Add 10–15 mm so the sweep meets the frame cleanly. Mark and cut the rubber strip to that length.
Hold the strip against the bottom of the closed door and set the edge 1–2 mm above the floor. You want contact without scraping; light contact seals better and wears slower.
Form two U-shaped wire clips to keep the strip aligned while you fix it. Space them roughly a hand’s width in from each end.
Pre-drill small pilot holes along the lower rail of the door every 120 mm or so. Offer up the rubber and fix with screws from the centre outwards to keep it straight.
Open and close the door several times. Adjust screw tension until the strip sits flat and kisses the floor with gentle pressure.
If the sweep whispers, it leaks. Quiet movement means a snug seal and less wasted heat.
Pro tips that solve awkward floors
- Uneven slabs: angle the wire clips slightly so pressure shifts to low spots.
- Don’t overtighten: a bowed door rail creates gaps; tighten just until the strip lies flat.
- Carpeted halls: trim the strip so it brushes fibres lightly rather than ploughing through them.
- Back doors that see rain: favour EPDM or leather and wipe it dry after storms.
- Fire doors: use a rated brush or seal kit instead and keep required clearances.
What households can save
Think in pounds and hours. If your winter space-heating spend sits near £900, trimming only 10% saves about £90. Leaky terraces and older semis often gain more, especially when you pair the sweep with letterbox brushes and heavy curtains. Some families report warmer hallways within minutes and fewer cold spots by bedtime.
| Item | Typical cost | Life span | Payback at 10% saving | Payback at 20% saving |
|---|---|---|---|---|
| Inner tube + screws + wire | £4–£8 | 3–4 winters | 1–2 weeks (on a £900 heating spend) | 3–5 days |
| EPDM strip + screws | £8–£12 | 4–6 winters | 2–3 weeks | 1–2 weeks |
Real-world checks that prove it works
Smoke test: hold a blown-out match, incense stick, or a strand of cotton near the gap on a windy day. Moving smoke or fluttering thread signals leakage. After fitting, repeat the test; still air means the gap is shut.
Paper test: trap a strip of paper under the door. If it slides out freely, add a fraction more pressure to the sweep. If it tears, back off slightly to avoid wear.
Thermal feel: run your hand across the floor inside the doorway at night. A cold stripe usually disappears once the seal beds in.
Where this fix shines
Front doors and flat entrances
Communal corridors push cold air toward flats. A sweep stops that tide and softens hallway echo.
Kitchens with back doors
Gaps multiply around old thresholds. Rubber glides over vinyl and keeps cooking smells from drifting through the house.
Home offices
Close the door, keep the room warm, and nudge the thermostat down a notch. Comfort rises while boilers cycle less.
Combine it for bigger wins
- Letterbox brush and a simple flap to block gusts.
- Keyhole cover on old mortice locks.
- Foam strip around the loft hatch.
- Thick, lined curtains over the door at night.
- Chimney balloon in unused fireplaces.
The cheapest kilowatt-hour is the one you never need to buy. Stop the leak, then heat the room.
Risks, rules and good practice
Keep ventilation safe. Never seal trickle vents or block grilles that serve boilers, fires, or cookers. Kitchens and bathrooms need clear extraction to carry moisture out; watch for condensation on windows after changes and open vents or crack a window if glass fogs.
Mind clearances. Wheelchair users and pushchairs need smooth movement; set the sweep height so the door still swings without force. Rental properties and fire doors may require approved seals; check the label on the door edge before you start.
Care and longevity
Wipe the strip with a damp cloth every couple of months to lift grit that causes scuffing. Check screws at the end of each heating season and snug them if timber has moved. Expect three to four winters from an inner-tube sweep and longer from EPDM or leather.
A quick cost–comfort simulation
Start with your last winter’s heating spend. Take 10–20% of that figure to sketch a saving band. Example: £900 becomes £90–£180. If the parts cost £8 and you save even £1.50 a day in gas or electricity, your door pays you back within a week. Stack two or three low-cost fixes and you create a warm “bubble” around living spaces without touching the boiler settings.
If you want to go further
Measure air temperature at ankle height and chest height with a cheap digital thermometer before and after fitting. A smaller gap between those readings means less cold pooling on the floor, so the room feels warmer at a lower thermostat setting. Track boiler run-time or smart meter data over seven days to see the effect in numbers.
For homes with uneven stone thresholds or listed-heritage doors, use a removable timber batten and fix the sweep to that batten instead of the original door. You protect the joinery, gain an easy service point, and keep the option to revert later without scars.


Love this kind of no-nonsense fix. I tried a DIY rubber sweep last winter and it made the hallway feel human again. For £6–£10 and half an hour, that’s definitly a win. Bonus: fewer spider guests under the door. Pairing it with a letterbox brush took the edge off our 1930s front door chills.
20% sounds huge. Are those savings measured against smart meter data or just estimates? I’m wary of optimistic headlines—reallly want numbers by house type and gap size.