Rain is back on the forecast, bills keep creeping up, and gardens still thirst. A quiet shift could change your routine.
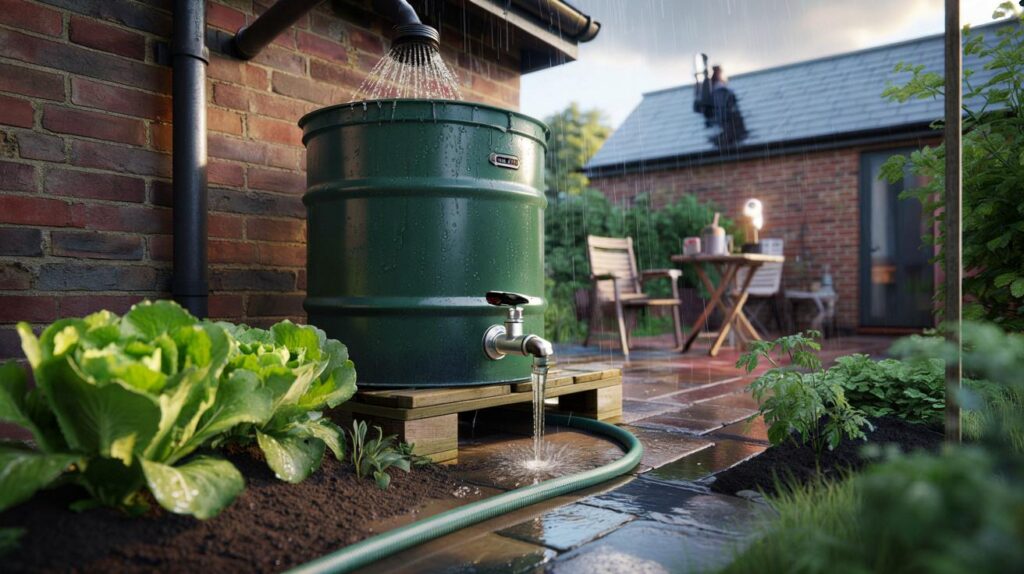
This autumn, home gardeners are turning rooftops into free reservoirs and cutting water use without gadgets or faff. A simple, near‑silent setup promises steady moisture for beds and fruit trees, while keeping costs under control. It takes an hour, a few basic parts, and a dash of care.
Why rainwater harvesting matters as bills climb
The gentle water plants prefer
Rainwater contains few dissolved salts and arrives softer than tap water. Seedlings respond with stronger growth. Leaves avoid limescale marks. Soil biology benefits, because you do not keep adding minerals that can harden beds over time. Captured rain also sidesteps hosepipe restrictions and pressure dips.
Freedom from daily watering and summer bans
Hand‑watering eats time and attention. A small gravity-fed line turns stored rain into measured drips. Beds receive moisture at root level, where it counts. You gain reliable watering during weekends away and heat spikes. The setup runs without electricity, programming, or subscription parts.
One salvaged container, a budget tap, and a thin hose can deliver fully autonomous watering for under €10.
Shop-bought kits under the microscope
Why many systems overcharge for small plots
Retail kits bundle proprietary tubing, electronic controllers and connectors. Prices often jump into the tens of euros before a single litre flows. For a balcony bed or a compact veg patch, that complexity brings little benefit. Long runs of microline need pressure you pay for. Batteries and screens add new failure points.
The DIY route that saves more than cash
Repurposing a stout container and a standard hose fitting cuts costs and friction. Gravity does the pumping. A raised tank boosts flow without a plug. The result is modular, repairable and easy to extend. Spare hose offcuts become drippers. Old bricks or pallets become a stand.
Under €10, zero drama: build the autonomous dripper
What you need
- A clean 40–100 litre container or drum with a lid, preferably food‑grade
- A budget brass or plastic tap (under €3) with matching washer
- 4–10 metres of thin hose for drip flow or soft PVC line
- A drill and hole saw or step bit to fit the tap shank
- Thread seal tape or a flat rubber gasket
- Two or three solid supports to raise the container 40–60 cm
- A simple mesh to keep leaves out of the inlet
How to set it up in under an hour
- Place the container below a downpipe, then raise it on blocks for extra head pressure.
- Drill a snug hole 2–4 cm from the base. Fit the tap, add seal tape, and tighten by hand.
- Attach the thin hose to the tap outlet. Run the line along beds and fruit trunks.
- Pierce tiny outlets near plant bases or add low‑cost drip tips at intervals.
- Cover the container. Add a leaf mesh at the downpipe entry to keep debris out.
Tips that prevent leaks and waste
Use a lid to reduce algae and mosquito risk. Keep joints dry during assembly so seal tape bonds well. Test with a small fill before the first heavy rain. If drips slow, raise the tank another 10 cm or widen the final outlet. A simple inline valve helps fine‑tune flow during cool spells.
Raise the tank; every 10 cm of height adds roughly 1 kPa of pressure, enough to revive sluggish drippers.
Running it day to day
Tune flow to weather and growth
Open the tap for a measured window every two or three days in spring. In hot weeks, extend duration or add a second line. Close and drain the tank before hard frosts to avoid splits. Restart when night temperatures rise. As canopies fill, move outlets closer to stems to beat leaf shading.
Fixes for common snags
- Seeping tap: add one more wrap of seal tape or replace the washer.
- Weak flow: raise the stand, shorten hose runs, or enlarge end holes slightly.
- Silt build‑up: flush the line monthly by opening the far end full bore for one minute.
- Debris at inlet: clean the mesh after windy days to protect volume.
The numbers that matter
Savings in litres and euros
A 100‑litre drum refilled by regular showers can deliver 1,000 litres across a growing season. That offsets mains use at a time when tariffs trend upward. For a family plot, it often covers salad beds, herbs, soft fruit canes and new trees. With purchase costs under €10 and no power draw, payback starts on day one.
How much water your roof can deliver
Multiply roof area by rainfall to estimate capture, then factor a small loss for splashes and overflow. The table below shows typical yields per 10 mm of rain.
| Roof area | Rainfall event | Usable water |
|---|---|---|
| 10 m² | 10 mm | ≈ 90 litres |
| 20 m² | 10 mm | ≈ 180 litres |
| 40 m² | 10 mm | ≈ 360 litres |
Ten millimetres of rain on a modest 20 m² roof can refill almost two 100‑litre drums, even after losses.
Why it outperforms fancy kit on small plots
Low pressure, low waste, high control
Gravity delivers a gentle flow that suits seedlings and sandy beds. There is no overspray or evaporation from sprinklers. Drips arrive at the root zone, so you use less water for the same result. You also see exactly how much remains in the tank, which sharpens your watering habits.
Safety, legality and good practice
Keep it covered and separate from mains water
Use a fitted lid to block light and reduce algae. Do not create fine mist from stored rainwater; stick to drip or trickle at soil level. Keep any rainwater plumbing entirely separate from household pipes. Use backflow protection if you ever connect a hose to an outside tap for flushing. Wash hands after maintenance.
Use on edible beds with care
Direct drips onto soil rather than leaves, especially for salads you eat raw. Clean the container twice a year with a brush and mild detergent, then rinse. Replace any cracked fittings promptly to avoid contamination.
Optional upgrades that still cost pennies
Simple add‑ons that stretch every litre
- Mulch 5–8 cm deep to halve evaporation around thirsty crops.
- Lay a cheap capillary mat under pots to share moisture evenly.
- Add a €2 inline tap to zone beds and fine‑tune timings.
- Swap the final nozzle for a porous soaker offcut for hedges.
Planning for winter and the next season
Drain, store and reset
Empty the tank before freezes. Store the hose indoors to preserve flexibility. Over winter, raise the stand by one block to improve spring pressure. Mark bed positions for next year so outlet holes land exactly where roots will be. If space allows, daisy‑chain a second container with a simple siphon to double capacity during wet months.
For readers who want more certainty, run a short simulation on paper. Estimate spring rainfall for your area, list roof area, and apply 85% efficiency. Compare the total to your crop demand: lettuces need about 3–4 litres per week each in warm spells, tomatoes 6–8 litres with mulch, new fruit trees 10–15 litres. Adjust hose outlets and timing until supply covers those peaks with a 20% buffer. The arithmetic takes minutes and prevents thirsty surprises in July.
There is one more benefit that rarely gets airtime: independence from timing. By shifting water collection to the days it actually rains and releasing it on your schedule, you smooth the weather’s ups and downs. That calm predictability, bought for less than the price of a sandwich, is what keeps small gardens thriving when the forecast turns fickle.


“Zero effort”? Drilling a drum and fiddling with seal tape sounds like some effort. Also, Brits paying in euros—can you actually source the tap + hose for under €9.99/£9 in the UK? Genuinly curious before I start hacking my downpipe.
Tried this last weekend and it works! 20 m² roof gave me ~180 L after a single 10 mm shower, just like your table. Tomatoes got drip-fed while I was away, no batteries, no faff. Thanks for the clear steps 🙂