We drop a mug. It chips, then shatters. In most homes, that’s the end of the story; in a garden, it can be the start of something quietly joyful.
I was standing on a small London balcony when the handle snapped off my favourite cup. I stared at the pieces, annoyed, already reaching for the bin. A neighbour across the way caught my eye, then pointed to her railing: a ribbon of colour snaking along the edge, made of old crockery and odd tiles, winking in the light. She mouthed, “Try it.” I gathered the shards in a tea towel and heard that clean, bright scrape as they shifted against each other. The idea felt both reckless and right. A week later, I was pressing a crescent of blue china into fresh grout, heartbeat ticking with each piece. You don’t see the pattern at first. It appears as you go. A secret arrives.
From shards to stories
Every balcony and garden has a quiet corner that never quite comes alive. A bit of wall. The top of a planter. The step that always feels unfinished. Broken cups carry colours you already love, and they’re tougher than they look. **Your balcony deserves more than beige.** Mosaic turns little accidents into a surface you’ll actually notice each morning, like a friendly wink from the past.
Lucy in Bristol messaged me a photo of her café table, now ringed with a halo of chipped mugs collected over years of shifts. Two hours after the last customer left, she traced a spiral with pale green shards and a slice of red handle, like a punctuation mark. Rain dried on it overnight, and it still looked fresh the next day. Ceramic isn’t easy to recycle, so most of it goes nowhere fast. Giving it a new life on a step or pot feels like cheating the bin.
Here’s why it works. Glazed ceramic is weather-hardy, and the curves of cup fragments sit neatly against grout, creating little valleys for light and shadow. The human eye likes repetition with a hint of chaos, which broken crockery gives you for free. A mosaic also forgives imperfection. A slightly crooked piece becomes character, not a flaw. The grout lines are the rhythm; the chips are the notes.
How to turn a mishap into mosaic
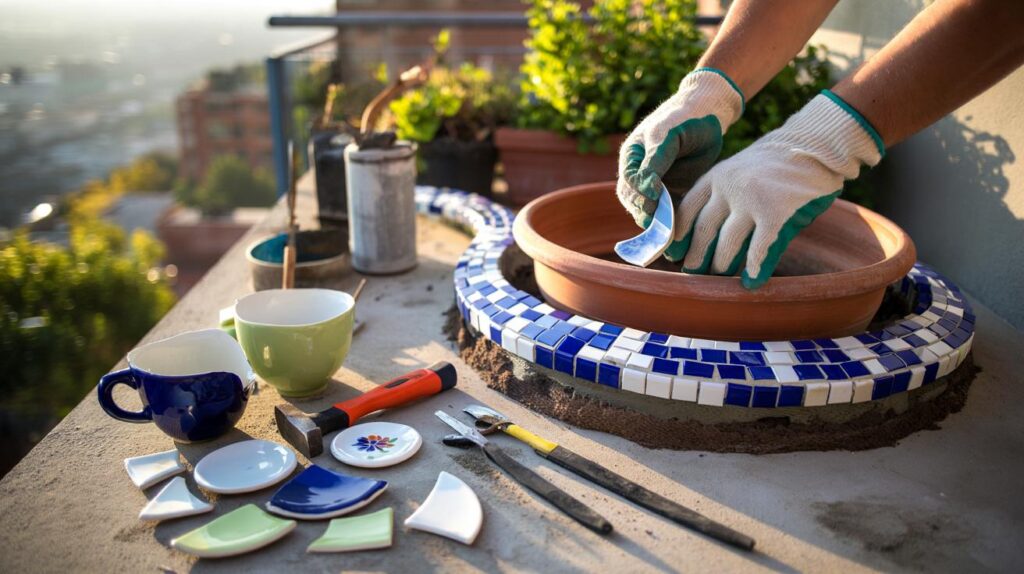
Start small. A terracotta saucer, a concrete stepping stone, a wooden crate lid sealed for outdoors. Wear gloves and eye protection, then wrap your cup in a tea towel and tap it with a hammer to get irregular, pleasing pieces. Lay them out dry first. Think in simple shapes: waves, a sunburst, a border you can follow with your hand. Use an exterior tile adhesive or thin-set mortar, butter the back of each shard, and press with a gentle twist. *Begin with one corner and let the line lead you.*
Mind the gaps. Two to four millimetres is a sweet spot for grout to fill and flex, especially outside. Wipe off glue squeeze-out as you go, or it’ll steal the grout’s place later. When the adhesive sets, mix outdoor grout to a yoghurt thickness and work it in with a squeegee or a gloved hand. Clean haze with a barely damp sponge in light passes. Let it cure, then seal if your winters bite. Let’s be honest: nobody really does that every day. We’ve all had that moment where we promise “I’ll get to it this weekend” and three Sundays slide past.
Common trip-ups? Using indoor glue, skipping a seal on wood, or leaving edges sharp. Round any fierce points with tile nippers, or rub them on a stone. Don’t rush the cure, either; patience is the secret ingredient nobody Instagrams. Grout is where the magic happens. It pulls scattered colour into a single thought, like stitching on a quilt.
“Cracks aren’t endings, they’re invitations,” says Rae, a community mosaic artist in Manchester. “You’re not hiding the break. You’re giving it a job and a place in the pattern.”
- Quick kit: gloves, safety glasses, tea towel, hammer, tile nippers, exterior adhesive, outdoor grout, sponge, sealant.
- Good bases: concrete pavers, terracotta pots, brick edges, marine-ply sealed with exterior varnish.
- Easy patterns: borders, rays from a centre point, a simple wave, scattered confetti with a single colour line.
- Colour tip: repeat one colour three times to make the eye believe the rest.
- Season care: cover in deep frosts, reseal once a year if exposed.
A small mosaic, a bigger shift
Once you start, you notice how many little ceramics live with you. The chipped bowl from your first flat. The souvenir mug from a beach you still think about. Pieces carry memory like scent, and a mosaic lets you walk over your stories barefoot. **Broken doesn’t mean finished.** It means the object is ready to change shape and remain with you, outside, where the light can find it.
I’ve seen stair risers edged with teacups from a grandmother’s set, and a birdbath that reads like confetti after a good party. Friends begin handing you their mishaps, and suddenly you’ve got a palette. There’s no gatekeeping here. No special training, just the care to look closely and the thrill of seeing a border bloom. A balcony rail becomes a timeline. A planter lip becomes a chorus. People will ask about it. You’ll tell a story.
What starts as saving a mug from the bin becomes a habit of noticing and mending. You stand outside for ten extra minutes, pressing in a bit of sky-coloured china, eyes soft, shoulders down. The weather passes over it and the colours keep speaking. Share a photo, swap shards with a neighbour, set a tiny mosaic night. The garden won’t judge your lines. It will carry them.
| Key points | Details | Interest for reader |
|---|---|---|
| Safety and prep | Gloves, glasses, towel wrap, light hammering, smooth sharp edges | Stay safe while turning breakage into art without stress |
| Right materials | Exterior adhesive, outdoor grout, sealed substrate, frost-aware choices | Long-lasting results that survive rain, sun and winter |
| Design that sings | Simple patterns, repeat colours, balanced spacing, clean grout lines | Instantly prettier balcony or garden with minimal fuss |
FAQ :
- Can I use any broken cup or plate?Most glazed ceramic and porcelain pieces work well. Avoid earthenware that powders easily, and test a small piece outside if you’re unsure.
- What surfaces are best for beginners?Concrete pavers, terracotta pots and stepping stones are forgiving. Wood needs sealing on all sides if it will live outdoors.
- Do I need a special adhesive?Use an exterior tile adhesive or thin-set mortar rated for outdoor use. Indoor glues can fail when rain and frost arrive.
- How do I stop the grout from cracking?Keep gaps consistent, don’t go too thin, and let everything cure fully. In colder climates, consider a flexible outdoor grout.
- How do I clean and care for the mosaic?Wipe with a soft brush and mild soapy water. Reseal once a year if exposed, and cover during severe freezes if you can.


Brilliant idea! I’ve got a box of chipped mugs from my gran and could never bin them. Quick question: after grouting, do you seal every time or only if winters are harsh? Our patio freezes now and then and I dont want hairline cracks sneaking in. Also, any tips to round those viscious shards without fancy tools? I only have a hammer and, um, patience.
Looks lovely, but is smashing ceramics really safe for beginners? Even wrapped in a towel, shards can fly, no? Indoor glues failing outdoors sounds like alot of faff—how many months before the whole thing starts flaking off?