A small bathroom, dulled by dated tiles and tired grout, can feel like a weight on the whole house. Budgets are tight, time is tighter, and ripping everything out isn’t always an option. Here’s the real-life fix one homeowner used to turn “ugh” into “oh!” with nothing more than glue, nerve, and a bit of design cheek.
The first thing I noticed was the sound. The fan hummed, the mirror clicked as it settled back on its hooks, and the tap dripped with the stubbornness of a metronome. Sarah stood with a mug of tea, surveying the beige 1990s tiles that had outlived at least two paint colours and one fashion cycle. She didn’t want a renovation. She wanted to feel good in the morning again. She wanted her bathroom to smile back.
We’ve all had that moment when the thing you see every day becomes the thing you can’t stand. The tiles were fine, but fine gets under your skin. She opened a cupboard, pulled out two tubes of grab adhesive, a stack of peel-and-stick tile decals, and a grout pen. The plan looked simple because it was simple.
She put the kettle on again. Clean, dry, glue, press, breathe. Then she did it all in one weekend. Just glue.
What a bit of glue can do to tired tiles
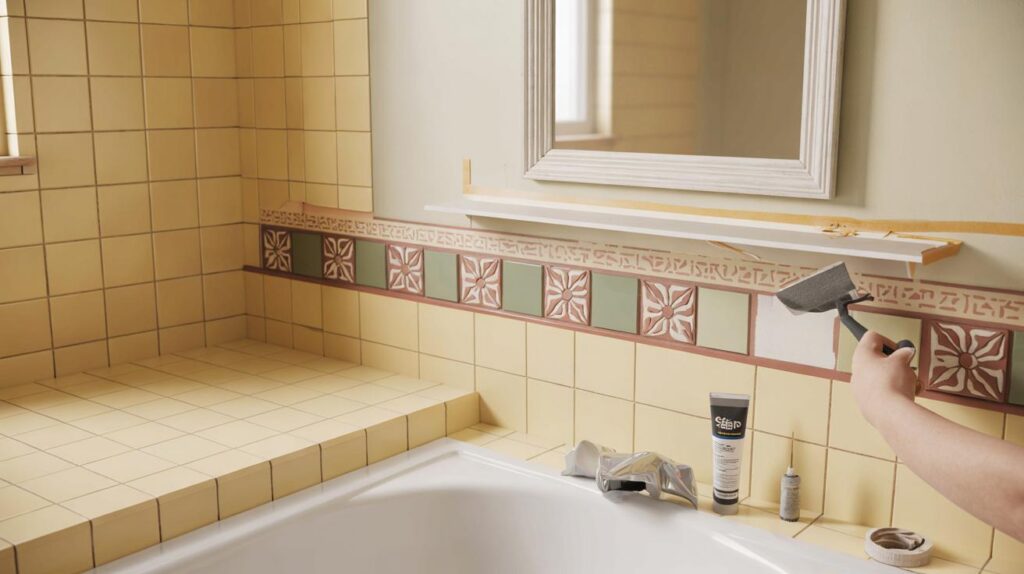
The bathroom wasn’t broken. It was bored. Beige squares, brown grout, a cracked trim at the bath edge, and a mirror that never quite felt finished. Sarah didn’t chase perfection. She chased warmth. She picked a palette of soft sage and chalk white, with one bold terracotta sticker pattern to break the grid and spark the eye.
Her starting point was the grout. Out came the sugar soap, the old toothbrush, and a blast of podcast energy. Then the grout pen. Line by quiet line, the room sharpened as if someone wiped smudges from a lens. Next came the decals: she placed a run of patterned squares above the bath like a ribbon, then framed the mirror with slim PVC trim straight from the DIY aisle, fixed with a neat bead of grab adhesive. The whole job cost under £70.
Why it works is simple psychology. Tiles are repetition; your brain goes numb reading the same note forever. Add a contrasting band or a framed focal point and the room suddenly has rhythm. Old tiles don’t need to disappear to feel new again; they just need better company. The adhesive does the quiet lifting, tying light trims and decals onto a surface that’s already there, so you get impact without demolition.
How she did it: a step-by-step glow-up you can copy
She cleaned like a pro. Degreaser first, warm water rinse, then a light scuff with a fine pad on glossy tiles to help adhesion. Tiles bone-dry, she snap-lined a subtle guide with painter’s tape for her “feature band.” The decals went on one by one: centre first, then left and right, smoothing from the middle with a felt squeegee. She cut edges with a sharp craft knife and a steel ruler, using a hairdryer on low to relax tricky corners. The grab adhesive came next for the mirror frame and the bath edge trim, pressed for 10 seconds, taped in place for an hour.
Soyons honnêtes : personne ne fait vraiment ça tous les jours. So she planned for an afternoon. She kept a damp cloth on hand for squeeze-out and switched to a clear, mould-resistant sealant around splash zones. Little upgrades layered the mood: a new pull cord tassel, a slimline shelf above the loo, and two matte hooks for hand towels. *The room started to sound quieter, somehow, as if the hard surfaces had softened.*
Glue can’t fix everything, but it can carry more beauty than you think. She didn’t rush the corners, didn’t stretch the stickers, and she gave the trims time to set before peeling the painter’s tape. Then she touched up chips with tile paint and brightened the grout on the floor with a second pass of the pen.
“I thought I wanted new tiles,” she told me, laughing. “Turns out, I wanted a story on the old ones.”
- Cost: ~£60–£90 depending on size and materials
- Time: One afternoon + overnight cure
- Skill: Beginner-friendly with patience
- Tools: Squeegee, craft knife, tape, cloth, hairdryer
- Materials: Peel-and-stick decals, grab adhesive, grout pen, PVC trim, sealant
Common wins, common slips, and the little secrets that matter
Choose your decals like you’d choose a scarf, not a coat. They should punctuate, not smother. Pattern works best in a clean line or a framed block—think a backsplash ribbon, a border around a mirror, or a “tile rug” behind a basin. Stick to two colours you already have in the room and one accent that thrills you a bit. It’s a bathroom; you look at it sleepy and you look at it stressed. Keep the rhythm calm.
Moisture is the quiet critic. Work with products made for bathrooms—water-resistant decals, mould-resistant sealant, and a reliable grab adhesive that stays flexible. Skip the steamy shower for 24 hours, and avoid applying over loose grout or flaking paint. If a tile is loose, re-bed it before the pretty stuff. And if your surface is wildly uneven, consider slim waterproof panels instead of stickers. They’re still a glue-up, still friendly on costs.
Don’t fight the tiles you have—frame them into a story you like. If the glaze is ultra-shiny, scuff lightly and clean again. Dryness is everything; a damp micro layer can ruin adhesion. If your space is small, go for fewer, bigger gestures, not decorative noise.
“It felt like learning to dress the room, not replace it,” Sarah said. “Once I framed the mirror and ran that little ribbon of pattern, I stopped seeing the beige. I saw shape.”
- Test a single decal low on the wall to see how it copes with steam.
- Keep edges crisp: a ruler and fresh blade make the difference.
- Run a fingertip of sealant along any edges near splashback.
- Warm the sticker gently if it’s stiff; cold vinyl can resist corners.
- Stand back every three tiles and adjust the story, not the grid.
Why this tiny transformation sticks—on the eye and on the wall
There’s thrift in it, sure, but also a change in tempo. A bathroom can feel like a corridor you rush through. This turns it into a pause. The glue, the decals, the neat trims—all small, all reversible—give you permission to experiment without the heavy consequence of renovation. The tiles become a backdrop again, not a verdict. And that’s quietly powerful. Next time you brush your teeth and stare at that stubborn wall, whisper a new brief to it: less beige, more story. Then take an afternoon and make the room answer back.
| Key points | Details | Interest for reader |
|---|---|---|
| Create a focal band or frame | Use peel-and-stick decals as a ribbon above the bath or as a mirror surround with PVC trim and grab adhesive | High impact with low spend; transforms “grid fatigue” into a designed look |
| Prep and patience win | Deep clean, lightly scuff shiny tiles, dry fully, align with painter’s tape, press and smooth from centre | Reduces bubbles, lifting, and wonky lines; results look pro without paying one |
| Protect where it splashes | Choose bathroom-rated materials, seal edges near water, let everything cure before steamy showers | Longevity without renovation; keeps the glow-up looking crisp for months and years |
FAQ :
- Will decals and trim actually stick in a steamy bathroom?Yes, if you use bathroom-rated decals and a quality flexible grab adhesive, prep well, and give them a full day to cure before hot showers.
- Can I remove everything later without ruining the tiles?Most vinyl decals peel off with gentle heat; trim fixed with grab adhesive may need careful prying and adhesive remover, but tiles generally come out fine.
- What if my grout lines are stained or patchy?A grout pen covers stains fast; if grout is crumbling, repair or regrout small sections first so you’re not gluing onto a failing base.
- Do I need special tools?No—just a squeegee, sharp craft knife, painter’s tape, cloth, and a hairdryer for easing corners; a metal ruler helps cut clean edges.
- How much should I budget for a small bathroom?Many readers complete a tidy refresh for £60–£120, depending on the number of decals, length of trim, and whether you add sealant and paint.


Loved the “feature band” idea and the mirror frame. The sage + terracotta actually makes the beige feel intentional. I tried a test decal low on the wall—the hairdryer trick defnitely helped. Any tips for cutting perfectly around a light switch without ragged edges? And grout pen brand recs? My first pass looked a bit streaky.