Your garden wants bones as much as blossoms. Edges that hold their line when the winter rain turns paths to porridge, and a place for birds and beetles to tuck in. A dry‑stone wall built from natural rocks won’t flinch at frost or fad, and it won’t lock out life either. It breathes, it drains, it lasts. And once you’ve done one, the rest of the garden makes sense.
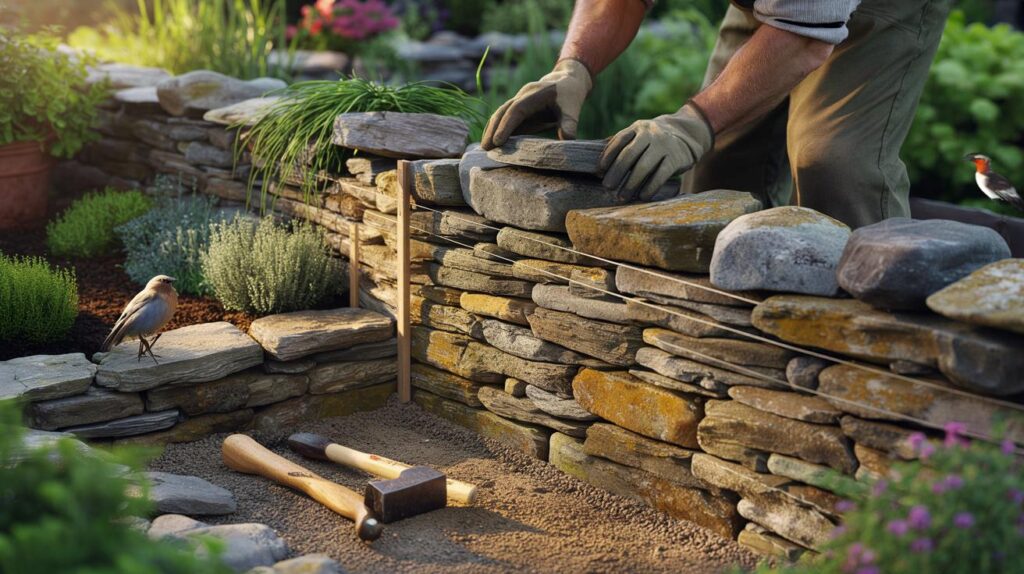
The first time I watched a wall grow from a muddle of rocks, it felt like theatre. A chilly Saturday, kettle chugging on a camping stove, and a line of string trembling in the wind as a neighbour set the first foundation stones. He barely spoke, just sorted, turned, and listened to the rock’s own stubborn logic. A robin kept hopping closer, as if approving each layer. By dusk, the garden looked older, steadier, as if it had been waiting for that wall all along. We stood back. Silent. Then he smiled and tapped one stone twice with his hammer. Done.
Why dry‑stone walls give a garden backbone
Dry‑stone walls hold a garden together without locking it down. Each stone carries weight and sheds water, so the whole stack flexes with the seasons. No cement, no rebar, just gravity, friction and craft doing the slow, quiet work.
They don’t just mark a boundary. They shape microclimates, create seating-height terraces, and offer ledges for thyme, sedum and self‑sown ferns. Small creatures find corridors between the hearting stones, and heat lingers in the mass after sunset. **You get structure that’s alive, not a dead barrier.**
There’s also a soothing honesty to the method. You use what you have, or what your landscape would naturally give: slate, limestone, granite, old fieldstones. The wall learns the garden’s dialect, not the other way round. Costs can be modest if you source locally and do the work yourself, and maintenance is mainly a spring wander with a glove and a bucket. A good wall outlasts sheds, fences and fashions.
The story a small wall can tell
In North Yorkshire, a couple built a 60‑cm retaining wall to level a slope for a vegetable bed. They spent two weekends gathering rounded fieldstone, and another two placing them with a string line and a thermos for courage. A few months on, the wall is silvering, and chives spill from the top course like a green fringe.
They saved on timber sleepers and avoided treated wood next to soil. The wall drains after heavy rain, the veg bed no longer slumps, and the robin still visits, now with a mate. That’s the quiet dividend of doing it right: fewer fixes, more life.
Look at the numbers and the method starts to sing. Aim for a batter — that gentle inward lean — of about 1 in 6 to 1 in 8. Base width close to half the wall’s height. Through‑stones every metre or so along the length. Hearting fills every pocket so water runs through but soil doesn’t. These ratios have kept hillsides stitched together for centuries. They’re not fads; they’re physics you can feel with your hands.
How to build it, from ground to coping
Start with a line and a trench. Mark your wall with string and pegs, then dig down 150–200 mm to firm subsoil, a touch deeper for retaining work. Lay 50–75 mm of compacted gravel where drainage is needed, and set your biggest, flattest foundation stones so they sit steady, not rocked. They should bridge the trench, faces out, long side into the wall. This is your first truth: the base decides the rest.
Build your faces together, course by course, always leaning in to your batter line. Place long stones “length in,” break vertical joints, and tuck hearting behind each face stone so nothing rattles. Drop in through‑stones at intervals to stitch the faces. Keep the top clean of chips so courses bed tight. Let the wall rise like a zipper from both ends toward the middle, never like a wonky staircase. *Your hands will learn the weight before your head does.*
We’ve all been there when a gorgeous rock just doesn’t fit, and you want to force it. Take the hint. Rotate it, use it elsewhere, or feather a sliver off with a bolster and goggles. Don’t chase level at the cost of bond, and don’t leave hollow pockets that invite frost to bite. **Let’s be honest: nobody checks string lines every five minutes.** Do it often enough that your wall keeps its lean and your joints criss‑cross like woven cloth.
This is where the wall starts to feel like a promise. You’re thinking with your fingertips now, not a shopping list. The last lift wants weight and patience, then coping stones big enough to lock the rhythm. A pro once told me:
“The wall should hold together before the coping goes on. The caps just stop mischief and weather.”
- Base rule: width ≈ half height; batter 1:6 to 1:8.
- Tools: walling hammer, bolster, gloves, eye protection, string lines, batter frames.
- Materials: foundation stones, face stones, hearting, through‑stones, coping.
- Retaining walls: add free‑draining backfill and a geotextile against fine soil.
- Seasoning: let a new wall settle a week before planting the top course.
Care, planting and living with a wall
A dry‑stone wall doesn’t end at the coping; it keeps working quietly. Give it a spring check, lift and reset any stone that wandered, and pull seedlings that pry at joints. If you fancy planting, tuck drought‑tolerant herbs into small pockets high on the sunny face and keep roots away from the base. **Leave wildlife plenty of undisturbed crevices.** You’ll notice birds hunting the sun‑warmed face, lizards if you’re lucky, and moss tracing the shaded side like old handwriting. A good wall slows you down in the best way. Guests will run their hands along it without thinking, and you’ll find yourself pausing there with a mug when the light goes soft. That’s not decoration. That’s place.
| Key points | Details | Interest for reader |
|---|---|---|
| Build on truth | Wide, stable base; consistent batter; through‑stones to stitch faces | Fewer failures, longer‑lasting structure |
| Work with what you have | Use local stone types; sort by size and shape; “length in” placement | Natural look that belongs to your landscape |
| Let it live | Drainage, hearting, wildlife crevices, light planting on top courses | Wall becomes habitat and feature, not just boundary |
FAQ :
- What stone works best for a dry‑stone wall?Local stone wins for looks and handling. Flat‑bedded rocks like sandstone or slate are easier for beginners, while rounded fieldstone needs more patience and hearting.
- How high can I build safely as a novice?Freestanding garden walls up to about 1 metre are a sensible first project if you keep the base wide and the batter true. Taller or retaining walls call for more experience or professional help.
- Do I need planning permission in the UK?Often not, but there are rules: next to a highway, anything over 1 metre may need consent; elsewhere, over 2 metres can trigger permission. Listed buildings and certain boundaries have extra controls. Check your local authority before you start.
- Can I plant into the wall?Yes, sparingly. Pop small, drought‑tolerant plants into pockets near the top courses so roots don’t unsettle the structure. Think thyme, saxifrages, sedum, erigeron.
- What’s the main mistake to avoid?Running vertical joints and skinny “face‑only” stones. Break joints, set length in, and fill every void with solid hearting. Your wall should feel tight before the coping goes on.


Loved the line about the wall ‘breathing.’ Beautiful writing and pratical tips—thanks!
So the robin is the site supervisor? I’ll pay in mealworms. Jokes aside, how often do you reset stones after the first winter?