Picture a tray of hopeful seedlings on your kitchen windowsill, stretching, sulking, then collapsing the night a late frost bites. The weather doesn’t read seed packets. Budgets aren’t rising either. A mini greenhouse made from scrap wood is the neat middle ground — cheap, compact, and strong enough to outsmart spring’s mood swings. It takes a few offcuts, some clear plastic, an hour or two, and a little stubbornness. The payoff is weeks of extra growing time and a small square of warmth you can rely on.
The first light hits the allotment like a shrug. A robin flicks along the fence, the soil is cold as a coin, and your breath hangs. I’m standing by a pile of bent pallet slats and a discoloured polycarbonate offcut, the sort that spends years behind a shed. Two cups of tea in, I’ve planed one clean edge, knocked together a box, and hinged the “lid” with two tired door hinges from a drawer that also contains a single Allen key. Steam blooms under the clear panel the moment it shuts. The seedlings inside look suddenly important. Something invisible is working.
Why a tiny greenhouse beats the weather
A mini greenhouse is simply a box that steals a few degrees from the day and gives them back at night. That small bump means less shock, quicker roots, and sturdy growth instead of leggy guessing. Built from **scrap wood**, it sits on a bed or a patio table and turns fickle days into something friendlier.
I watched Saira, on a tight corner plot in Bristol, build one from pallet rails and the window of a retired shed. Two afternoons later, her spinach sat under its clear lid like athletes in warm-up jackets. Inside temperatures ran 3–7°C higher on cold days, and her first pickings landed three weeks earlier than last year. She didn’t fiddle. She checked it with a finger and a cheap thermometer, then got on with her life.
Here’s the magic: sunlight slips through the clear top, warms the soil, and the enclosure slows the escape of that heat. The air stays calmer, humidity hugs the leaves, and the soil doesn’t lose energy to wind. Add a couple of water-filled bottles for thermal mass and you bank warmth like a battery. With the lid propped in midday sun, you dodge scorch and mildew while keeping the night kind.
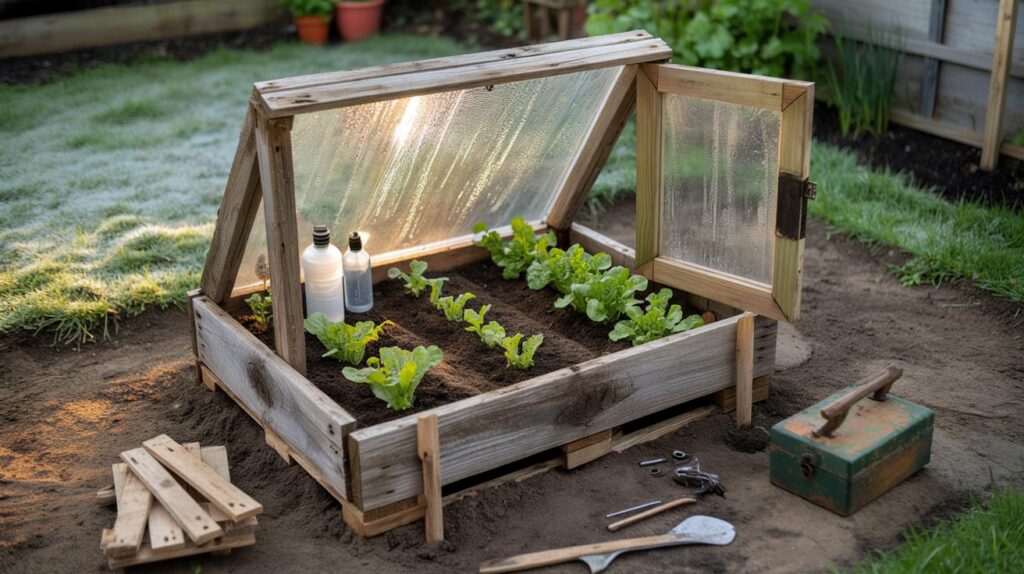
Build it in an afternoon: step-by-step
Keep it simple. Cut four lengths of scrounged timber to make a 120 cm by 60 cm rectangle, then another four for a matching top frame. Screw the corners, add one diagonal brace on each frame, and plane rough edges so the lid sits flat. Skin the top frame with clear polycarbonate, an old shower screen, or heavy polythene pulled tight and tacked with battens.
Hinge the lid to the base with whatever metal you have: gate hinges, cupboard hinges, even an old leather belt and screws if you like a bodge that lasts. Fit a small handle. Drill two holes in the front rail for a simple vent stick so you can prop the lid open on warm days. Push two stakes through the base into the soil to stop the wind lifting it. We’ve all had that moment when a gust turns a project into a kite.
Place it where it gets the longest run of sun, ideally south-facing and out of the wind’s main corridor. Lift the lid a crack if condensation runs like rain at midday, and open it wide when air feels close. Let’s be honest: nobody really does that every day. A cheap max–min thermometer helps you learn the rhythm of your patch without the fuss, and a bucket of water inside smooths the temperature swing.
“I thought it needed to be perfect,” says Mo, who built his for nothing from two pallets and a cracked skylight. “Turns out plants wanted consistency, not fancy.”
- Frame: 4 rails for the base, 4 for the lid, plus two diagonal braces.
- Skin: clear sheet (polycarbonate, old window, shower door, or heavy polythene).
- Hardware: screws, two hinges, a handle, and stakes or pegs for anchoring.
- Vent: a stick with notches or a simple hook-and-eye set for props.
- Extras: water bottles for thermal mass, scrap bubble wrap for frosty nights.
A small frame, a longer season
Think of this as a microclimate you can dial. Start hardy salads, spring onions, beetroot, and herbs under cover in late winter. Shift on to tomatoes and courgettes the moment nights stop biting. Rotate it over fresh soil every fortnight to dodge pests and keep roots exploring. Your garden gets a head start, then a steady drumbeat of harvests.
*On the first cold April morning you catch the sun steaming the lid, you’ll understand why growers swear by these boxes.* The world outside might be sulking and grey, but your seedlings are rehearsing for summer. It’s a small, controlled rebellion.
Build one and you won’t stop at one. A second frame stacks on top for taller plants. A third turns into a drying rack for herbs in August. There’s room here for experiments, for shortcuts, for the kind of practical optimism that keeps people sowing even when the forecast can’t be trusted.
| Key points | Details | Interest for reader |
|---|---|---|
| Size and shape | 120×60 cm base fits most beds and takes common sheet offcuts | Easy to plan, light to move, big enough for real yields |
| Materials that work | Pallet rails, old windows or polycarbonate, basic hinges, vent stick | Spend almost nothing and build with what’s to hand |
| Control the climate | Prop the lid for airflow, add water bottles for thermal mass | Reduce frost risk, avoid scorch, and stretch the season |
FAQ :
- What’s the best scrap wood to use?Straight pallet slats or decking offcuts are ideal. Avoid rotten timber and anything saturated with unknown treatments, and sand splinters where hands will touch.
- Can I use old windows or a shower door for the lid?Yes. Toughened glass or polycarbonate is brilliant. If weight is high, keep the lid smaller or add a simple side stay so it doesn’t slam in wind.
- How do I stop it overheating on sunny days?Prop the lid 2–5 cm as soon as the inside climbs past 20–25°C. A notched stick or hook system makes it repeatable even when you’re busy.
- What about anchoring in strong wind?Drive stakes through the base, add a cross-brace, and, if you’re on paving, use sandbags or two bricks tied with a strap. Keep the profile low in exposed spots.
- What can I grow, and when?Start salads, chard, and beetroot in late winter; harden off tomatoes, beans, and courgettes in late spring. Slide it over late carrots or winter herbs to keep harvests sweet.


Just built a 120×60 frame from pallet slats and a cracked shower door. The notched vent stick is genius—I kept the lid propped at ~3 cm and avoided that midday sauna. Two 2L water bottles inside smoothed the temp swings overnight; seedlings looked way less sulky this morning. Only tweak: I added small corner brackets so the lid sits flatter. Thx for the nudge; this feels like cheating spring. Defintely doing another.