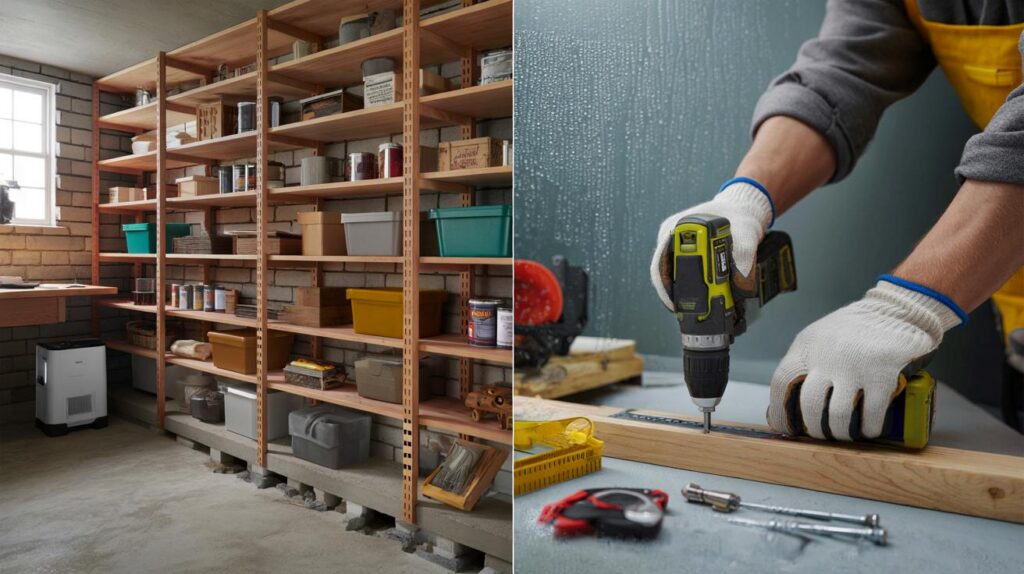
The basement is where good intentions go to hide. Damp corners. Tippy towers of boxes. Lost gloves, rogue bulbs, and the mystery cable you’re scared to throw away. Sturdy shelves change that story.
I watched the rain thread down the window while the dehumidifier hummed and the concrete floor bit through my socks. The basement smelt faintly of earth and old cardboard, and every box I nudged seemed to release a tangle of Christmas lights. I held a tape measure with numb fingers, marked a dusty joist with a pencil, then stepped back through a maze of paint tins and camping kit like I was crossing a quiet sea. A mug of tea cooled on the freezer as I sketched a rectangle, then another, the shape of order teasing itself out of the chaos in slow, careful lines. The air felt lighter already. Then the penny dropped.
Sturdy shelves, calmer brain: why strength matters
Strong shelving isn’t a luxury down there; it’s the backbone that lets a space pull its weight. Get boxes off the floor, cheat the damp, and you’re no longer tiptoeing around piles that move when you breathe. Build once, build solid, and the whole room starts speaking a different language: **no wobble, no guessing, no drama**.
My neighbour Maya built a wall-to-wall unit in a Saturday burst with timber studs, 18 mm plywood, and determination. She spent less than a new flat-pack wardrobe and doubled her storage. We measured: 3.6 metres wide, 450 mm deep, five shelves, each bay braced. We’ve all had that moment when you find winter boots in July and vow to get your life together. *Yes, you can do this in a weekend.*
Think like a bridge builder, not a decorator. Vertical supports carry load; horizontal spans need modest distances to stay stiff. Timber studs (around 38 x 89 mm, often sold as 2×4) are ideal uprights, while 18–21 mm ply resists sag on 600–900 mm spans. Anchor the frame to the wall so it can’t rack. The floor might be slightly out; the wall is your friend for rigidity.
DIY made simple: materials, layout, and the build
Start with a sketch, a tape, and a spirit level. Measure ceiling height, note pipes and sockets, then mark a clean rectangle on the wall where the shelves will live. Plan bay widths of 600–900 mm, shelf depth of 400–500 mm, and a 30–50 mm gap from the floor for airflow. Buy treated CLS or stud timber for uprights, 18–21 mm ply or OSB for shelves, corrosion-resistant screws, masonry fixings if your wall is brick or block, and a box of patience.
Cut two identical “ladder” frames for each shelf level: front and back rails with short noggins every 400–600 mm. Screw those together square, then fix the rear ladders to the wall at your chosen heights. Add the front ladders on legs, plumb and level, and tie front to back with the noggins. Drop the ply on top and screw it down. Aim for 60–80 mm screw spacing at corners and 150–200 mm along edges. **Treated timber** buys you peace in a space that breathes damp.
Soyons honnêtes : personne ne fait vraiment ça tous les jours. Mistakes creep in when you rush the first level or guess the load. Don’t overreach spans because a single sheet looks neat; a sagging shelf will nag forever. Label as you cut. Pre-drill near edges to avoid splitting. If your floor is wonky, use plastic packers under the front legs and check for level with each fix. **Label as you go** and you’ll thank yourself later.
“Slow is smooth, smooth is fast,” my grandad said while building a shed, and the shed’s still standing.
- Mark studs or drill test holes to find solid fixing points in masonry.
- Use 70–100 mm wood screws for timber-to-timber, and shield anchors or frame fixings for brick or block.
- Keep heavy stuff low, everyday stuff at chest height, and seasonal kit up high.
- Seal the ply edges with varnish or paint to shrug off basement humidity.
Living with it: a system that keeps itself tidy
Good shelves solve half the problem. The rest is habit, containers, and a layout that matches real life. Zone by theme: tools, cleaning, sport, memories, pantry overflow. Give each zone a bay or a level. Clear bins look tidy in photos, but opaque boxes with bold labels are kinder on the eye and the brain when you’re in a rush.
Think traffic. Things you grab often sit between waist and eye level, closest to the door. Rarely used kit goes high or deep. Keep an empty “landing shelf” for stuff you’re still deciding about; that small compromise stops pile-ups elsewhere. Rotate the pantry every season, and when a box overflows, split it before it becomes a leaning tower. Let it breathe. Your shoulders will drop each time you walk in.
Maintenance shouldn’t be a chore with a calendar invite. Quick five-minute resets after a project, a quarterly purge of expired paint, a fresh label when a category changes. This isn’t perfection; it’s a room that works with you. Order that’s easy to reach is order that lasts.
| Key points | Details | Interest for reader |
|---|---|---|
| Design for strength first | Use 38×89 mm uprights, 18–21 mm shelves, spans of 600–900 mm | Stops sag and wobble, lasts for years |
| Fix to the wall | Rear ladder frames anchored to studs or masonry with proper fixings | Safe, rigid, and square even on uneven floors |
| Plan the zones | Heavy low, frequent at chest height, seasonal high; label as you go | Keeps the space tidy with minimal effort |
FAQ :
- What size timber should I use for the frame?Go for standard studs around 38 x 89 mm (often sold as 2×4). They balance strength, price, and ease of handling in tight spaces.
- How much weight can each shelf hold?With 18–21 mm ply, bays of 600–900 mm, and a frame screwed to the wall, a shelf will comfortably take 60–100 kg when evenly spread.
- Do I need to fix the shelves to the wall?Yes for stability. Use long wood screws into studs, or shield anchors/frame fixings in brick or block, and tie every level at several points.
- How do I protect timber from basement damp?Choose treated timber, paint or varnish exposed edges, keep shelves off the floor by 30–50 mm, and run a dehumidifier if the room is clammy.
- What’s the best shelf depth?Most people love 400–500 mm. Deep enough for boxes and tins, shallow enough that things don’t get lost at the back.


Built mine last weekend using the ladder-frame approach—rock solid. Only change: I used 21mm OSB for the shelfs and it feels bombproof. Thanks for the clear spacing tips!
That 60–100 kg per shelf figure—have you actually load-tested, or is it calculated from span and material? I’m anchoring into mixed brick and crumbly mortar; would frame fixings beat shield anchors there? Also, any deflection numbers for 18 mm ply at 800 mm span? Trying not to overbuild but I don’t want sag in six months.