British households are quietly turning budget buys into statement pieces, using a handful of tools, a free afternoon and £6 frames.
With a little nerve and some paint, plain frames shift from functional to conversation-starting. Social feeds brim with examples, but the real story sits in the methods, costs and pitfalls most people miss.
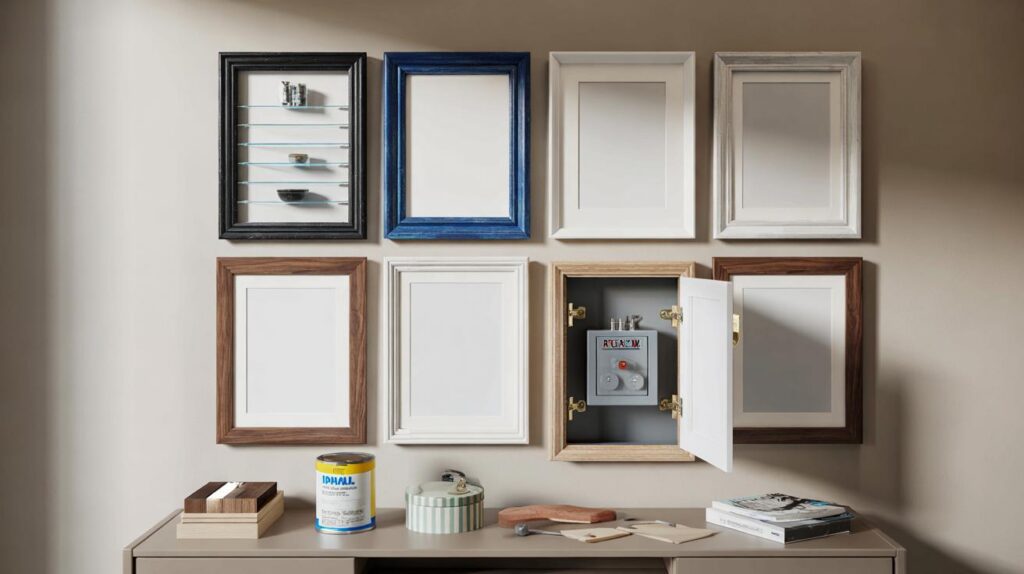
Why cheap frames are the perfect blank canvas
Low-cost frames give you uniform sizes, clean lines and replaceable parts, so mistakes rarely ruin a project. The shallow profiles suit hallways and tight spaces. Deep shadow-box versions, like IKEA’s SANNAHED, add space for three-dimensional items without the weight of a cabinet.
Because the frames start at £6, you can test finishes you’d never try on pricey timber. A can of spray primer, an offcut of veneer banding and a metre of moulding can change the look completely. If a colour jars, sand lightly, prime and repaint.
From £6 to showpiece: a frame, a primer coat and one bold idea can outshine shop-bought wall art.
What you can build from a single frame
- A shadow-box cabinet for toys, keepsakes or medals
- A striped, moulded frame that mimics bespoke joinery
- A hinged cover to hide an eyesore such as a fuse box
- A faux-vintage walnut finish using veneer edge banding
- A colour-blocked border for playful kids’ rooms
Three hacks worth trying this weekend
Turn SANNAHED into a toy or keepsake cabinet
Australian creator Adrian Widjy popularised a neat twist: use the SANNAHED’s deep profile as a display cabinet for collectables. The principle suits action figures, small plushies or travel souvenirs. You’re not building a case from scratch; you’re upgrading the frame into a shallow cabinet that hangs flush.
How to do it:
- Remove the backer and glazing. Keep the glazing safe for later.
- Cut a thin plywood insert to fit the backer. Paint or wrap it with fabric or wallpaper offcuts.
- Fix small acrylic shelves or clear risers with countersunk screws or strong tape. Keep loads light.
- Add discreet magnets around the interior edge and matching steel tabs on the glazing so it snaps shut.
- Rehang using proper wall anchors, not just picture hooks, to handle the added weight.
Budget guide: frame £6–£12, magnets £3–£6, acrylic shelves £6–£15, fixings £3. Time: two to three hours. Skill level: patient beginner.
Shadow-box frames make smart cabinets when you add magnets and slim shelves; keep it light and it stays safe.
Hide a fuse box with hinged Rödalm art
Norwegian DIYer Camilla Bakken showed how a simple pair of RÖDALM frames can sit as a hinged camouflaging panel. The idea works for routers, thermostats and utility controls you want out of sight but still accessible.
How to do it:
- Measure the utility box plus 30–50 mm clearance on all sides to allow airflow and easy access.
- Mount a slim timber batten above and below the box. Screw two tiny cabinet hinges to one frame and the batten.
- Hang a second frame beside it for balance, or use a diptych print split across both frames.
- Use magnetic catches or a turn-button to keep the door frame shut.
- Avoid drilling into the box cover. Maintain manufacturer clearances for safety and insurance.
Budget guide: two frames from £7 each, hinges and catches £4–£8, battens £3. Time: 60–90 minutes. Skill level: confident beginner.
Conceal, don’t block: a hinged frame hides the box while leaving space and swift access for emergencies.
Give Lomviken a striped, moulded makeover
Interiors specialist Bradley Dreya boosted a LOMVIKEN by gluing on slim moulding strips and taping crisp lines before painting a vivid blue. The trick sells because it adds shadow lines and depth, so the budget aluminium reads as bespoke timber.
How to do it:
- Degrease the frame, then scuff-sand with 320-grit. Wipe dust away.
- Prime with an etch or multi-surface primer suitable for metal. Let it cure as directed.
- Cut lightweight moulding strips with a mitre box. Glue carefully, clamp with tape and allow to set.
- Mask stripes with quality tape. Burnish edges, then paint two thin coats. Peel tape while paint is slightly wet.
- Finish with a satin clear coat for durability.
Budget guide: frame from £12, primer £8, paint £6–£12, moulding £5–£10, tape £3–£5. Time: two hours plus drying. Skill level: beginner with patience.
| Project | Extra spend | Time | Skill level |
|---|---|---|---|
| SANNAHED display cabinet | £12–£24 | 2–3 hours | Beginner |
| Rödalm fuse box cover | £14–£22 | 1–1.5 hours | Beginner |
| Lomviken striped makeover | £19–£35 | 2+ hours | Beginner |
Tools and materials checklist
- Primer for your frame material (metal, wood or plastic)
- Spray paint or water-based enamel
- Masking tape, craft knife, sanding blocks
- Veneer edge banding and an iron (for faux-walnut looks)
- Lightweight moulding strips, mitre box, wood glue
- Rare-earth magnets, tiny hinges, magnetic catches
- Wall anchors rated for the final weight
- Acrylic instead of glass for kids’ rooms or busy hallways
Finish choices that look pricier than they are
Colour blocking lifts small frames. Pick one punchy shade from your print and run it around the inner edge. For a subtle nod to mid-century, heat-activate walnut veneer banding along the outer edge, trim, then seal with clear satin. A colour-matched mount board adds depth without changing the frame.
Texture matters. A light stipple from a foam roller can hide minor imperfections on older frames. If you’re chasing a luxe feel, keep sheens consistent across moulding and frame, and swap stock glazing for low-reflection acrylic to reduce glare near windows.
Prime first, then paint: scuff, degrease and use the right primer to avoid chips and peeling on aluminium frames.
Safety, renting and where to draw the line
Never overload a frame-turned-cabinet. Shadow boxes are for small, light objects. Use acrylic glazing wherever children play. When covering a fuse box, maintain clearance and ventilation, fit a quick-release catch and ensure the switch remains accessible. If you rent, consider command-style strips for lightweight frames and battens fixed into mortar joints rather than brittle plaster.
Think about fire routes. Don’t mount protruding displays along narrow stairs. On freshly painted frames, let coatings cure fully before handling; many paints need days, not hours, to harden.
Your budget, compared to shop-bought
A bespoke gallery frame with moulding, glazing and a custom mount can run £60–£120 each. The hacks here land between £18 and £47 all in, using off-the-shelf frames from £6 and small hardware packs. Spread the spend across a wall of nine frames and you save hundreds, while picking finishes that match your room rather than settling for near-misses.
Test combinations first. Tape sample strips of paint and veneer directly on a spare frame and hang it for two days. Check how morning and evening light shift the tone. Swap in a different mount colour before you commit.
Extra ideas to try next
Line frames with cork and use short pins for rotating postcards. Add LED puck lights to a deep frame, but keep wiring neat and use rechargeable units to avoid trailing cables. For a quick win, wrap the frame’s inner edge with washi tape, then seal with clear varnish. If you run a rental, standardise on two frame sizes so you can reshuffle art between rooms without new fixings.
There’s one risk worth flagging: humidity can bow thin backers. Seal edges with tape or swap the stock backer for 3 mm MDF. The payoff is big. With a few careful steps, that £6 rectangle turns into the part of your home everyone notices first.


Tested the SANNAHED display-cabinet hack this afternon—used 3 mm acrylic shelves and tiny rare-earth magnets. Tip: scuff, prime, then two thin coats or the paint will scratch. Looks legit, but keep the load super light; my kid’s die-cast cars started to bow the backer until I swapped to 3 mm MDF. Brilliant guide.
£18–£47 all-in sounds optimistic—are you counting primer, quality tape, anchors, clearcoat, and a proper mitre box? Feels like the bits and bobs add up fast. Not knocking the idea, just trying to budget without the “oh, I forgot the thing” tax.