October brings chilly mornings and stiff shutters, and households across Britain face a choice between call-out fees and DIY nerve.
Across suburbs and city streets, people are reporting the same headache: a roller shutter that squeals, hangs askew, or jams halfway. Repair firms quote three-figure call-out charges, and waiting lists grow when nights draw in. A simple, careful reset can often restore smooth movement in minutes, saving money and heat as temperatures fall.
Why your roller shutter goes wonky
Spot the tell-tale skew and drag
A curtain that drops lower on one side almost always signals misalignment. You may see a gap on one track and a tight pinch on the other. The handle or motor can feel strained. A sharp click or clack suggests the curtain’s top edge has shifted on its fastenings.
Even a one-centimetre offset is enough to make the curtain bind, scrape and stop, particularly on colder, stiffer mornings.
Watch the shutter from outside and inside. Look level with the bottom lath as it travels. A slow, diagonal descent confirms a guide problem rather than an electrical fault. If the tube turns but the curtain stalls, the issue likely sits with fixings or guides, not the motor.
Three usual suspects: curtain, fixings, guides
- Curtain out of the guides: a lath edge slips past the brush strip and rides outside the channel.
- Loose or broken top fixings: the straps or clips that connect the curtain to the axle have shifted or failed.
- Dirty or bent guides: grit, leaves, or a slight dent increases friction and steers the curtain off track.
Each point is visible with careful inspection. You can often correct the first two at home. Distorted guides or torn laths call for new parts or a specialist.
The 5-minute realignment people swear by
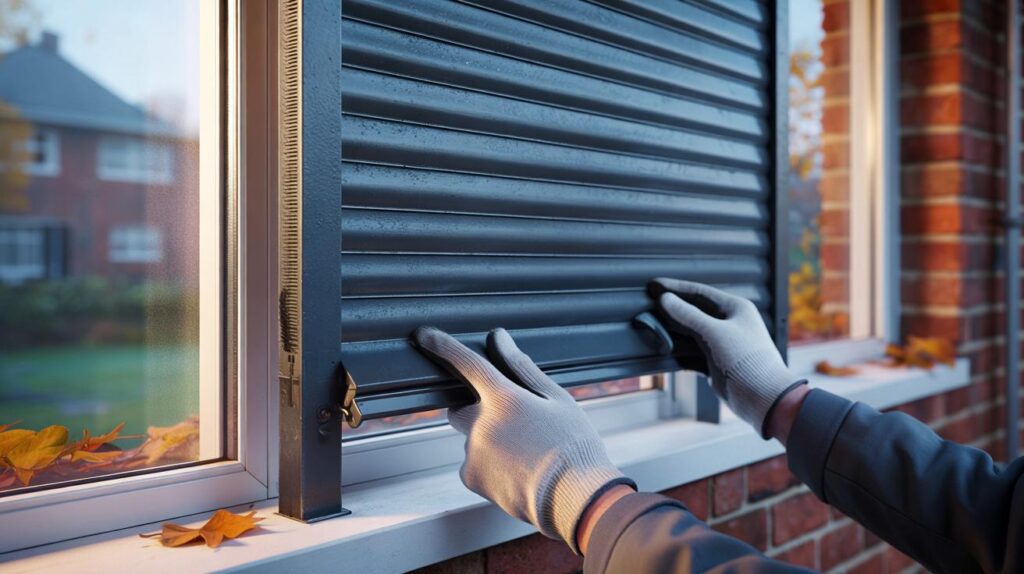
Guide the curtain back into the guides
Start by stopping the travel near where it binds. Lower the shutter gently until the stuck side touches resistance. Do not force the crank or switch.
- Support the bottom bar with one hand to take weight off the skewed side.
- With your other hand, ease the escaped lath edge back behind the guide’s inner brush.
- Use small up-and-down pulses on the strap, handle or switch to settle the lath into the channel.
- Keep fingers clear of pinch points and wear thin gloves for grip.
Light pulses and gentle guidance reset the curtain in seconds; force bends laths, buries grit deeper, and multiplies the bill.
Once the edge sits square in both guides, raise the shutter halfway. Stop. Then lower it fully. This tests the track. If it stays square, you have solved the skew and relieved the strain on the axle.
Check and reset the top fixings
Many misalignments begin where the curtain attaches to the axle. A loose strap lets one side lag and tilt. You can often correct this without dismantling the box.
- Cut power at the isolation switch for motorised units. Unplug battery backups if fitted.
- Open the cover carefully. Support the curtain so it cannot drop.
- Inspect each strap or clip. Re-seat a slipped strap into its slot. Tighten screws if present.
- Replace cracked plastic clips. Keep a pair of universal straps in a drawer for quick fixes.
- Restore power and test short movements before closing the cover.
If the motor runs but the tube does not turn, you have a failed drive or crown wheel. Stop there and book a repairer to avoid further damage.
Prevent a repeat when nights draw in
Clean, lubricate and listen
Dust and grit act like sandpaper in narrow guides. A quarterly clean keeps travel straight and quiet.
- Vacuum guides from top to bottom, focusing on the brush strips.
- Wipe laths with a damp cloth and mild soap. Rinse. Dry before rolling up.
- Apply a light silicone spray to guides. Avoid oil that gums up in cold weather.
- Run the shutter twice to distribute lubricant and confirm a smooth glide.
Tune in to sound and speed. New squeals, a sluggish rise, or a judder on the way down warn of friction or fixings on the move.
Small checks that save big bills
- Monthly visual check: look for uneven gaps, scuffs on lath edges, or shiny wear marks in guides.
- Seasonal strap check: ensure all top straps sit straight and share load evenly.
- Limit settings: if your motor stops too early or too late, recalibrate per the manufacturer’s steps.
| Issue | Typical time | DIY cost | Call-out estimate |
|---|---|---|---|
| Curtain out of guide | 5–10 minutes | £0 | £90–£150 |
| Loose top strap | 10–20 minutes | £5–£12 per strap | £120–£200 |
| Dirty guides | 15 minutes | £4 silicone spray | £80–£140 |
When to stop and call a pro
Not every fault welcomes a screwdriver. Stop and book a technician if you notice these red flags.
- Bent bottom bar or visibly twisted laths.
- Motor hums but stalls, trips power, or smells hot.
- Guide channels crushed by impact or wall movement.
- Security shutter with anti-lift locks engaged and no service key.
- Units under warranty where DIY may void cover.
If the shutter feels heavier than usual, or the motor strains, pause immediately; heat and force turn a minor reset into a replacement.
Extra help for a smoother, warmer home
Know your mechanism
Strap-driven shutters forgive gentle manual pulses during resets. Crank systems allow fine control but can tempt over-torque; turn the handle in small arcs. Motorised models need power isolated before any cover comes off. Keep the manual to hand for limit-setting, as mis-set stops can mimic a jam.
Energy and comfort gains
A square, snug shutter reduces draughts and slows heat loss after dusk. That matters when daytime highs fall into single digits. Regular cleaning also cuts noise, so bedrooms stay restful when you lower shutters late.
Parts and planning
Stock a pair of universal straps and a small tube of silicone spray. Label the isolation switch for each motorised shutter. Take a phone photo of the top fixings before you touch anything; it speeds reassembly and helps if you later seek help.
Risk, reward and a simple rule
DIY saves money and time when you step lightly and stop early at warning signs. If you need to force it, you are fixing the wrong thing. Realignment should feel smooth and calm, and it should take minutes, not an afternoon.


Tried the gentle up-down pulses and easing the lath back behind the brush—worked in under 3 minutes, saved me a £150 call-out. Cheers! 🙂
For motorised units, is it really safe to open the cover without dismantling anything? I’ll isolate power, but does this risk voiding warranty on Somfy-style drives?