Winter DIY is back, bathrooms are gleaming, and nerves are frayed. One slip with the drill, and the tile pays the price.
Across the country, homeowners are hanging mirrors, rails and shelves as nights draw in. The fear is familiar. A brittle crack, a chipped edge, a ruined finish. The cause is rarely brute force alone. It is preparation. And a small, almost cheeky detail turns anxiety into control.
Why tiles crack under the drill
Glazed tiles are hard at the surface and rigid through the body. A spinning bit that skates across the glaze concentrates stress. That stress turns into radial fractures. Porcelain adds density, so heat builds fast. Soft faience chips easily. Mosaic needs delicate pressure, because tiny pieces can lift. The substrate matters too. Hollow voids behind the tile amplify vibration.
The first ten seconds decide the fate of your tile. Control the bit, manage heat, and spread the load.
Speed magnifies heat. Heat weakens the glaze. A hammer setting sends shock into a brittle material. The trio—speed, heat, shock—creates a spider’s web of cracks. Break that trio, and the hole stays clean.
The tiny step that saves your tiles
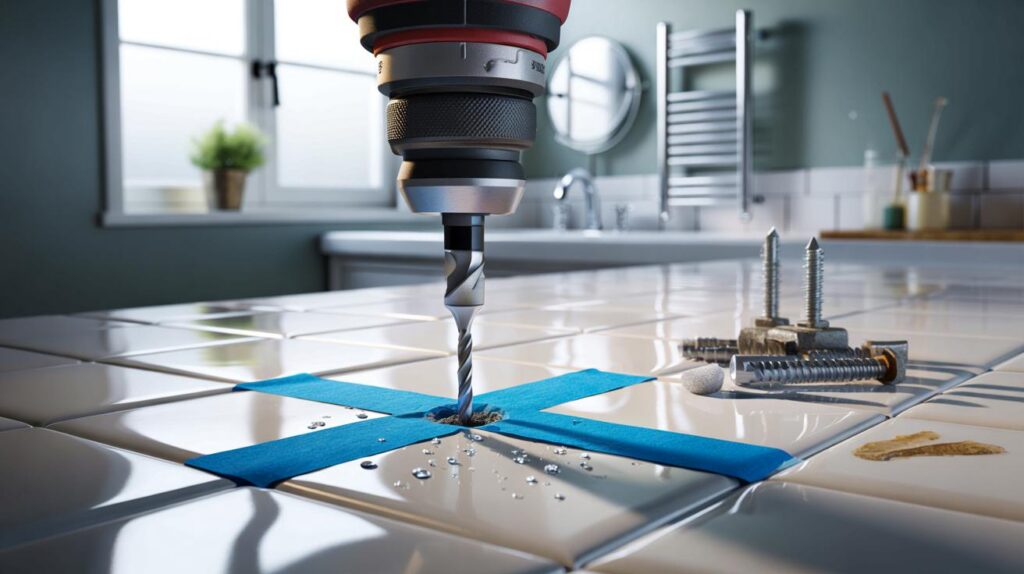
Use tape as a brake and cushion
One small strip of masking tape changes everything. Two strips in a cross work even better. The tape grips the bit, stops skating and softens impact. It also gives you a crisp, high-contrast mark to aim for.
Cross two pieces of masking tape over the spot. It acts as traction, shock absorber and sightline in one.
Press the tape firmly so no grit sits underneath. Mark the centre with a fine pencil. If accuracy must be perfect, hold a small timber guide with a 3 mm pilot hole against the tape. The guide prevents wandering as you start.
Tools and settings that actually work
Pick the bit for the tile, not the wall. Carbide spear tips cut standard ceramic cleanly. Diamond-tipped bits grind tough porcelain and glass without tearing. High-quality multi-material bits handle easy jobs, but they dull fast on hard tiles.
| Bit type | Best for | Start speed (rpm) | Cooling |
|---|---|---|---|
| Carbide spear tip | Glazed ceramic, faience | 300–600 | Dab with water every 5–10 seconds |
| Diamond core/needle bit | Porcelain, grès cérame, glass | 200–400 | Constant trickle or wet sponge |
| Diamond hole saw (20–60 mm) | Large holes for taps or outlets | 150–300 | Water reservoir or putty dam |
Speed, pressure and cooling
Kill the hammer function. Select low gear. Squeeze the trigger so the bit just cuts. Keep your elbows tucked and the drill square. Let the tool do the work. Add only gentle, steady pressure. Pause often to cool the tip. A wet sponge touched to the bit clears dust and cuts heat.
Low rpm, no percussion, light pressure, wet tip—this simple quartet prevents chips and keeps the glaze intact.
A three-step method you can trust
- Tape and mark: cross two strips of masking tape; dot the centre with a pencil.
- Start the divot: hold the bit at a slight angle to bite, then bring it upright as the tip seats.
- Drill and cool: 300–600 rpm, no hammer, with pauses to wet the bit; finish through the substrate.
Fixings and finishes that keep damage at bay
Behind the tile lies either masonry or plasterboard. Choose anchors for the layer behind, not the tile itself. In masonry, standard nylon plugs work well once the bit breaks through. In plasterboard, use metal cavity anchors or toggle fixings sized to the load. Drill 6 mm for light hooks, 8 mm for medium rails, and 10 mm for heavy brackets, as specified by the manufacturer.
Seat washers between brackets and tile faces to spread force. Nip up screws, then stop. Overtightening cracks glaze. Seal holes in wet zones with a drop of sanitary silicone before inserting the plug. This blocks moisture and protects the substrate.
Safety and hidden hazards
Scan for pipes and cables before you start. A simple detector avoids an expensive leak or a tripped breaker. Wear eye protection. Tape a small envelope below the hole to catch dust, or hold a vacuum nozzle under the bit. Never start a hole on a grout line unless the design demands it. Grout is softer and can crumble, leaving a loose fixing.
Seven mistakes that cost you tiles
- Starting too fast: heat builds, glaze crazes; begin slow and keep it cool.
- Hammer mode on: shock travels, edges chip; switch to rotary only.
- Wrong bit: masonry bits skate and shred; pick carbide or diamond for the tile.
- No tape: the bit wanders; tape adds grip and control.
- Heavy pressure: the face cracks; use a light, constant feed.
- Dry drilling on porcelain: friction wins; add water often.
- Guessing the fixing: weak anchors fail; match plug to the wall behind.
Time, cost and a practice plan
A decent carbide spear-tip bit costs £3–£8. Diamond bits range from £5–£12. A 35 mm diamond hole saw sits between £10 and £20. A roll of masking tape is a couple of pounds. Budget three minutes per hole for setup, marking and cooling. That small pause protects a £20 tile and saves a day of rework.
Three careful minutes per hole beat a cracked tile and a £100 refit every single time.
If you have a spare offcut, rehearse the first hole. Mark, tape, start the divot, keep it wet, break through. Adjust your pressure until dust appears as fine powder, not scorched grain. That texture tells you speed and feed are right.
Advanced tips for hard porcelain and glass
Use a guide and a water dam
For porcelain, clamp a drilling guide or hold a timber template with a 6–8 mm pilot hole. Build a ring of plumber’s putty around the mark and fill it with water. This cools the bit and captures slurry. For glass tiles, only use diamond-tipped bits, with the slowest speed and constant cooling.
Large holes without chips
For mixers or waste pipes, use a diamond hole saw. Score the circle by tilting the saw to start, then level it after a shallow groove forms. Keep the rim wet. Once the tile face is through, you can increase speed slightly to finish the cut cleanly.
When to call a professional
Bring in a tradesperson if holes exceed 12 mm on brittle or textured tiles, if tiles cost more than £50 each, or if underfloor heating sits nearby. A pro will use jigs, continuous cooling and vacuum rigs that minimise risk in one visit.
Extra angles that save grief later
Plan the hole pattern with a paper template taped to the wall. Measure from fixed references, not from skirting or worktops that can be out. Keep minimum 15 mm from tile edges to avoid leverage cracks. If the substrate is crumbly, inject resin anchors rather than relying on oversize plugs.
Think about load paths. A 3 kg mirror hung on two points puts 1.5 kg on each fixing in still air, but more when doors slam. Add one extra fixing per bracket for margin. Where steam is constant, use stainless screws and capped washers to prevent rust marks around the holes.


Masking tape saves tiles? I’m sold.