Across Britain, fresh paint meets cold nights. Homeowners crave crisp colour lines, yet stray drips and fuzzy edges keep spoiling rooms.
As accent walls and bold trims surge again, the finish at the boundary matters. A clean junction between two colours changes how a room reads, how light travels, and how your efforts look to guests.
Why sharp borders change a room
A razor line makes budget paint look curated. It strengthens contrast, frames architectural features, and tidies up corners. People notice edges first because the eye tracks lines before it reads planes. A sloppy boundary pulls attention to the mistake and away from the scheme.
A crisp line makes small rooms feel ordered, makes strong colours look deliberate, and makes cheap paint look expensive.
Soft edges telegraph shortcuts. A slightly wavy join can shrink a wall visually or distort symmetry around door frames. When the heating goes on and blinds stay closed, lamplight amplifies these flaws.
Common mistakes that blur the line
- Pressing painter’s tape lightly, leaving micro gaps for paint to creep.
- Flooding the edge with a heavy roller, which forces pigment under the tape.
- Using high-tack masking tape that tears the cured layer on removal.
- Pulling tape after the paint film has hardened, which rips and leaves ragged flakes.
- Skipping the pre-seal coat along the tape edge on porous walls.
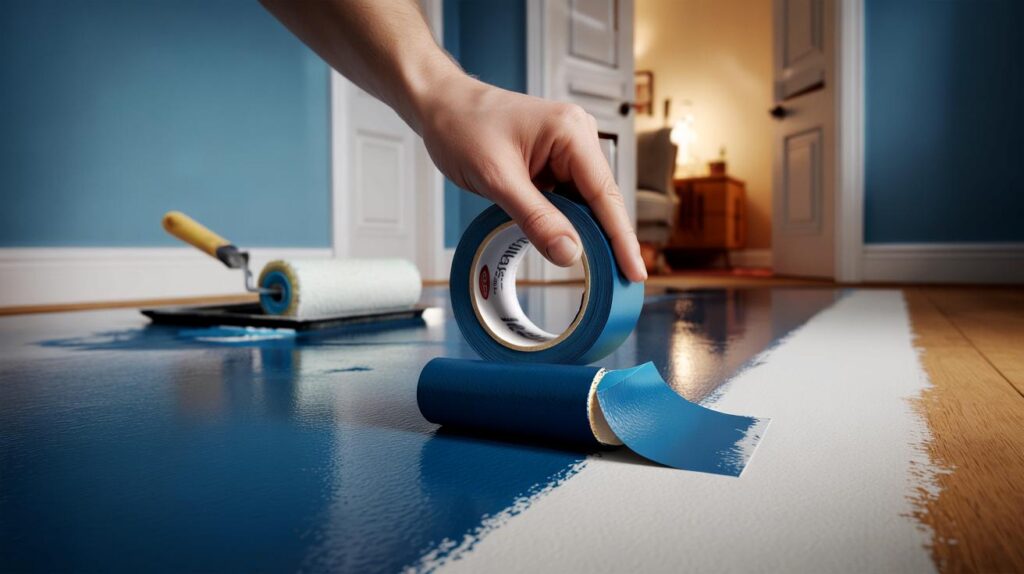
The tape choice that sets you up to win
Preparation decides the outcome long before the first coat. Tape quality, adhesive level, and width must suit your wall and paint. A medium-adhesion painter’s tape guards the edge without biting into the base colour.
Pick the right tape for your wall and paint
| Surface | Recommended tape | Width | Notes |
|---|---|---|---|
| Freshly painted, smooth plaster (over 24 hours dry) | Low to medium adhesion painter’s tape | 24–36 mm | Check the can for recoat window; do a small test pull. |
| Matt emulsion on old skim | Medium adhesion with edge-seal technology | 24–36 mm | Burnish firmly; consider a sealing coat of the base colour. |
| Lightly textured or orange-peel | Slightly stretchable painter’s tape | 36 mm | Work in short lengths to follow relief without gaps. |
| Gloss or satin woodwork | Low-tack for delicate surfaces | 24 mm | Degrease first. Pull back on itself at removal. |
How to lay tape so paint cannot creep
Clean the line with a damp microfibre cloth and let it dry. Mark the boundary with a level or a laser so the run is straight. Apply tape in manageable lengths, overlapping by a few millimetres at joins. Press along the full edge with a plastic card or silicone spatula to seat the adhesive. This single act blocks capillary seepage.
On porous or uneven walls, run a thin pass of the first colour along the tape edge to seal the gaps before you add the second colour.
Seal only a narrow strip. Let it set to touch-dry. You have now created a dam that locks the line.
The timing trick: pull while the paint is fresh
Many people wait for paint to dry fully and then yank the tape. That rips the skin and drags flakes across the boundary. Timing reverses the result.
Apply like a pro
- Load the roller evenly, then roll off excess on the tray so it does not pool at the edge.
- Make two light-to-medium passes, one vertical, one horizontal, to level the coat.
- Keep the final pass rolling away from the taped line rather than into it.
- Stop adding paint at the moment coverage becomes uniform; overworking warms and wets the edge.
When to pull for a razor line
Remove the tape while the final coat is still fresh to the touch, before the film cures. That window sits between five and twenty minutes for most water-based emulsions, depending on temperature and humidity. Start at the top, lift the tape to break contact, then pull back on itself at roughly 45–60 degrees, keeping the tape low to the surface.
Lift the tape before the paint skins over. Pull slowly, at an angle, and keep the peeled edge clean.
Work in stages along the boundary. If you spot a snag, pause and score lightly along the edge with a sharp knife, then continue the pull. Do not wait for full cure.
Quick fixes when something goes wrong
Smears that appear while the paint is still wet can be dabbed away with a barely damp, lint-free cloth and a steady hand. For dry ridges, score gently with a craft blade and lift the burr with the point, then touch up with a fine artist’s brush. Keep a small cup of each colour ready for micro-corrections.
Step-by-step snapshot you can follow tonight
- Wash, fill, sand, and dry the surface. Dust off thoroughly.
- Mark a straight line with a level. Tape along the mark in short sections.
- Burnish the tape edge. Pre-seal the edge with the first colour if the wall is porous.
- Roll on the second colour in light, even passes. Avoid flooding the edge.
- Pull the tape while the paint is fresh, back on itself, at a shallow angle.
Real-world numbers that help you plan
One 25 mm x 50 m roll of painter’s tape, often around £6, usually covers the edges of a typical 3–4 m feature wall with spare for door frames. Expect 15–25 minutes to tape a straight run carefully, five minutes per coat for a small wall, and a few minutes for a clean pull. You trade half an hour for a finish that reads as professional every time you enter the room.
Conditions inside British homes that affect the edge
Cool rooms and damp air slow drying and shrink the timing window. Warm the space to around 18–20°C and keep relative humidity under 60% where possible. Open a window briefly between coats to clear moisture, then close it to avoid dust. Old plaster can remain chalky; use a primer sealer first so tape adheres and the paint film binds.
Houses built before the 1970s may hide older coatings. Avoid dry sanding unknown layers. If you uncover brittle, powdery paint, stabilise with the right sealer and handle debris carefully.
Colour pairings and where to place the line
High contrast needs a sharper line than close tones. Navy against off-white, charcoal against warm beige, and forest green against pale grey benefit most from precision. Place the join on a corner return, the shadow line of a picture rail, or the top edge of a dado for natural cover. Where two colours meet on a flat wall, a laser line and the pre-seal method earn their keep.
Alternative methods when tape is tricky
- Use a clear matte glaze as the sealing pass if you cannot spare more of the base colour.
- On heavy texture, run a thin bead of decorator’s caulk along the tape edge, smooth it, then paint once it skins.
- For repeat projects, invest in a small edging tool with a guard; still finish with the fresh-pull technique.
Choose the right tape, seal the edge, and pull while fresh. Three moves, one crisp line.


This is the clearest guide I’ve read on getting crisp lines. The “seal the edge, then pull while fresh” sequence is defintely going in my toolkit. Any tips for cutting in around radiators without losing the razor edge?