Your garage should be more than a cold room where things go to be lost. It can be a workshop, a refuge, a place where you fix the wobbly chair and build the thing you keep talking about. A sturdy workbench is the hinge that swings it from chaos to possibility. Not fancy. Just strong, flat, and ready. The kind of bench that says: put the tool down here, and get on with it.
It starts on a Saturday morning that smells of dust and old paint. Bikes lean like awkward cousins, a lawnmower glares from the corner, and an apologetic fold-out table shakes every time you touch it. Coffee balances on a stack of tins like a circus act you didn’t ask to attend. You clear a strip of floor, pull out a tape measure, and the space begins to answer back.
We’ve all had that moment where a job keeps slipping away because the surface won’t steady the work. You’re not avoiding the project; the room’s avoiding you. A proper bench changes how the garage feels, how you stand, how you think. It changes the story. The fix isn’t bought — it’s built.
Why a sturdy workbench transforms the whole room
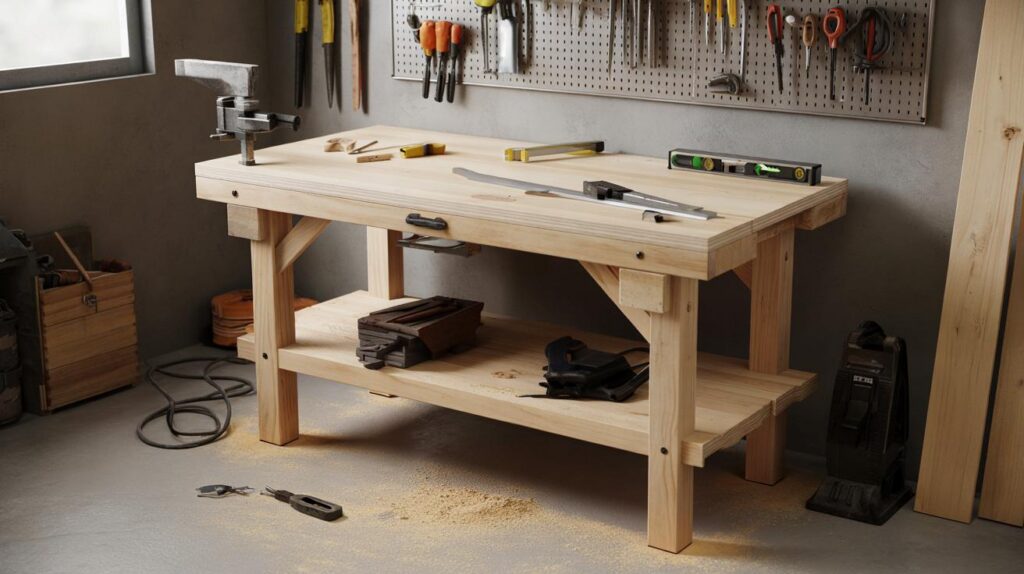
A workbench gives the garage a centre of gravity. The moment it’s in, everything else has somewhere to belong. Tools get a home edge, clamps finally bite, and timber sits true rather than surfing on plastic. Built at wrist height — roughly 900 mm (36 in) for most people — it stops the hunching and the faffing.
Give it an overhang of 50–75 mm so you can clamp on all sides. Go for a **solid top**: 18 mm ply laminated to 18 mm MDF is rugged, cheap, and flatter than most kitchen tables. Add one vice now or bolt pattern holes later for jigs. A bench isn’t just furniture. It’s momentum.
Here’s what that looks like when it lands. Ben in Leeds carved out a 1.8 m x 0.75 m bench from 2x4s and two sheets of board. Cost: under £140 all in. He kept 300 mm clear around it, hung a rail of French cleats above, and suddenly three square metres reappeared from nowhere.
The wobbly trestles went to the tip. The car still fits because the bench hugged the wall, and he added locking castors to roll it forward when he needs to rip a long board. He swears the noise went down too — fewer dropped tools, fewer curses. His projects sped up because the bench said yes instead of maybe.
Strength isn’t magic; it’s triangles and weight in the right places. Box your legs as pairs, tie them with stretchers near the top and bottom, and that stops racking. Screws and glue turn 2x4s into a quiet, heavy frame that won’t have opinions on Monday morning.
Want a dead-flat surface? A laminated top behaves. Want bombproof? Build a torsion box from thin ply and a grid of noggins. Either way, spread the load across the frame, not just the corners. Keep the bench 600–800 mm deep — enough reach without becoming a dumping ground. That’s how you get a bench that feels calm under a hammer.
How to build it: simple plan, better results
Measure your space, then cut smart. Aim for 1.5–1.8 m long, 0.6–0.75 m deep, 0.9 m high. Build two leg frames from 2x4s: each has two legs and a top and bottom rail. Use a square, pre-drill, and glue every joint. Join the two frames with front and back stretchers, then add a lower shelf stretcher to park heavy gear.
Top it with 18 mm ply, then 18 mm MDF glued and screwed, edges flushed with a router or sanded smooth. Leave a small overhang for clamps. If your floor slopes, fit adjustable feet or sit the bench on packers until the bubble sits quiet. Add a 19 mm (3/4 in) sacrificial hardboard skin later if you like to drill, bleed paint, and not cry about it. Yes, you can build this in a weekend.
Common errors are all friendly to fix. People forget the overhang, and suddenly clamps don’t reach — easy to avoid on paper. Frames go out of square when you rush; dry-fit and measure diagonals until both match. Floors lie. Shim under the feet or fit levellers before you blame the timber.
Others pick skinny screws or skip glue, then wonder why the bench chatters. Use 5–6 mm wood screws 80–100 mm long and a PVA or PU glue that doesn’t panic in a cold garage. Leave an overhang on the left or right for a vice; you’ll want it. Seal the MDF with diluted varnish or shellac so spills don’t soak and swell. Let’s be honest: nobody really does that every day. Try once, and your future self will nod.
Build with kindness for the work and yourself. Mount a work light at forehead height and add a four-gang extension with a switch so you’re not crawling under the bench with a torch. Bolt the frame to the wall if you’re a heavy sawyer. Your wrists will thank you.
“Square is kind. Level is kind. If it doesn’t rock now, it won’t start an argument later,” my grandad used to say, tapping the bubble like a referee.
- Cut list: 2x4s for four legs (900 mm), four top rails (600–750 mm), four bottom rails (same), and two long stretchers (1,500–1,800 mm).
- Top: 18 mm plywood + 18 mm MDF, cut flush to frame, 50–75 mm overhang for clamping.
- Fixings: 5×80 mm or 6×100 mm wood screws, wood glue, pocket holes optional, coach bolts for vice.
- Tools: circular saw with guide, drill/driver, square, clamps, level, sander, tape, pencil, pride.
- Upgrades: locking castors, French cleat rail, metal jaw vice, dog holes, magnetic tool strip.
Make space to make things
A bench creates its own orbit. Pegboard above for daily tools. A shelf below for the heavy, ugly stuff that works as ballast. A shallow drawer for the bits you always lose. Anchor one corner with a vice and give yourself 400 mm of overhang for long stock.
Run cable tidy along the back and keep a switched multi-socket at waist height — **safe power** beats extension snakes every time. Fit a strip light under a shelf to light the work surface without throwing shadows. If your garage is tight, add wheels: roll it out to sweep; roll it back to park. A bench that moves is a bench that gets used.
Think beyond wood. A steel cutting corner with a sacrificial steel sheet. A silicone mat for electronics. A clamp-on mitre saw shelf that folds when the car comes home. Build the bench once, then let the top evolve. That’s the fun bit. That’s the point.
When a room begins to work with you, the rest of life follows. You start finishing things. You invite your kid to hold the tape. You fix the speaker instead of binning it. The bench is a simple promise you keep with yourself, one screw at a time.
Maybe you share the build with a neighbour and borrow their clamps, then pass the favour on. Maybe the first top gets scars and you flip it over for a fresh face. Maybe the bench grows into a station for bikes, shelves, and that small boat you’ll probably name on a whim. **Build once, learn forever.** Feel the calm of a flat surface, the click of a clamp, the quiet that follows when a job finally lands.
| Key points | Details | Interest for reader |
|---|---|---|
| Right size, right height | 1.5–1.8 m long, 0.6–0.75 m deep, ~900 mm high with 50–75 mm overhang | Comfortable reach, easy clamping, fits most UK garages |
| Rock-solid frame | 2×4 legs boxed with top/bottom rails, glued and screwed, stretchers front/back | Zero wobble, safer cuts, calmer work |
| Flat, durable top | 18 mm ply laminated to 18 mm MDF, sealed; optional sacrificial skin | Cleaner glue-ups, accurate assemblies, longer life |
FAQ :
- What timber should I use for the frame?Standard 38×89 mm (2×4) construction timber is fine. Pick the straightest lengths you can, let them acclimatise overnight, and cut away any twists.
- How much weight will this bench hold?A glued-and-screwed 2×4 frame with a double-layer top comfortably handles several hundred kilos. Spread heavy loads across stretchers and the lower shelf.
- Is MDF safe for a worktop?MDF is flat and lovely to work on when sealed. Pair it with plywood for strength, wear a mask when cutting, and seal the edges so spills don’t puff it up.
- Should I fix the bench to the wall?If you do heavy planing or want ultimate stiffness, yes. Screw a ledger into studs and lag the bench frame to it. Otherwise, weight plus good feet is plenty.
- How do I keep the bench tidy?Give every tool a home within arm’s reach and keep a shallow tray on the right for screws. Clear the top at the end of a session — tomorrow-you will smile.


Built a version of this today and the 18mm ply + MDF top is solid as a rock. Definately feels like the garage got calmer. Locking casters were a win too.
Is MDF really okay in a damp-ish garage? Won’t it puff up over time even if sealed?