A growing number of households are quietly repairing battered doors during autumn, driven by tight budgets and colder nights at home.
Against a backdrop of rising costs and a rush to make homes snug before winter, a quiet trend is gathering pace: people are mending glaring holes in lightweight interior doors without replacing them. The draw is obvious—low cost, short hands-on time, and a near-invisible finish that spares embarrassment and a hefty bill.
Why a hole needn’t mean a new door
Most modern interior doors aren’t solid wood. They’re a light, hollow construction with a cardboard honeycomb core and thin skins front and back. That keeps them cheap and easy to hang, but it also makes them vulnerable. One misplaced shoulder, a flying toy or a clumsy move with furniture can leave a fist-sized crater.
Replacement doors start from about £45 for basic hollow-core models, and fitting pushes the outlay higher. A local carpenter may charge £80–£150 for a repair or full swap. Against that, a can of expanding foam and a small tub of finishing filler cost less than £30 combined, while the job needs around 45 minutes of actual work, spread over drying stages.
People are repairing door holes for under £30, with around 45 minutes of hands-on effort and a finish that blends in.
The method making the rounds
Clean edges first
Trim ragged fibres and splinters so the hole has a crisp outline. Remove loose debris. Wipe the area with a damp cloth and let it dry. Mask the perimeter with tape to shield the surrounding panel from stray foam or filler dust.
Foam sparingly, then trim flush
Shake the expanding foam can. Apply a little at a time into the cavity, aiming behind the door skin to recreate support, not to flood the void. Foam grows rapidly—more is not better. Let it cure as per the can, usually 30–60 minutes for a light fill. When firm, slice excess back flush with a sharp knife.
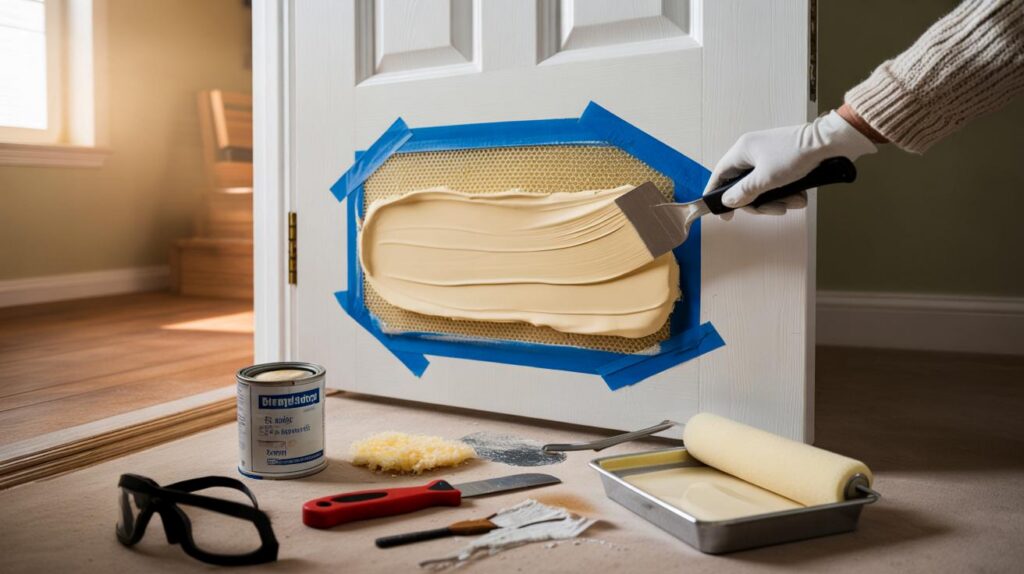
Build the face with thin coats of filler
Use a flexible filling knife to spread a thin layer of finishing filler across the patch, feathering it on to sound door skin. Allow it to dry, then sand lightly to flatten. Repeat with two or three thin passes. Multiple fine coats settle smoother than one thick smear and avoid cracking. When the surface feels dead-flat under your palm, it’s ready for paint.
Thin coats win: two or three light layers of filler, with gentle sanding between, hide the repair line.
Painting that hides the evidence
Match colour and sheen, not just colour
Paint hideouts often fail because the sheen is wrong. If the door is satin, a matt tester won’t blend. Take a small flake from the damaged area to a paint counter for a close match. Use a mini roller on broad areas to mimic a factory-sprayed texture; reserve a fine brush for the edge of the repair.
Blend or repaint the full panel
If the door has yellowed or picked up years of scuffs, the new patch may look too fresh. In that case, roll a full-panel coat. For subtly textured doors, dab gently with a sponge while the paint is tacky to echo the original grain.
- Hands-on time: roughly 45 minutes
- Drying time: 30–60 minutes for foam, 2–4 hours per filler coat, 1–2 hours per paint coat
- Typical spend: £18 foam, £7 filler, £3–£5 sandpaper, £6–£12 paint
What people are actually paying
| Option | Upfront cost | Time to finish | Result | Best for |
|---|---|---|---|---|
| DIY foam + filler | £25–£40 | Same day to next day | Discreet, near-invisible if painted well | Standard hollow-core doors |
| Call a tradesperson | £80–£150 | 1 visit | Professional match and finish | Busy households, tricky finishes |
| Replace door | £45–£150 plus fitting | Half-day | Brand-new leaf | Severe damage, warped frames |
Common mistakes and how to dodge them
Overfilling with foam
Flooding the hole makes a bulge that fights every later step. Apply a modest amount, let it expand, then top up if needed.
Skipping dust removal
Dust kills adhesion. After sanding, vacuum and wipe the patch before the next coat. A clean surface keeps the finish crisp.
Rushing the paint
Paint dragged over damp filler or fresh foam can blister and flash. Let each layer dry. Check the can for times, and give yourself breathing space between coats.
Mask, fill, sand, paint: patience beats speed if you want the repair line to vanish in daylight.
When this trick works—and when it doesn’t
This method suits most interior, hollow-core doors with non-structural damage up to, say, a dinner-plate in size. It restores stiffness under the skin and a smooth face. It does not suit fire doors, security doors, or swollen, water-damaged leaves where integrity matters. If the latch area or hinge side has splintered, a timber insert or a replacement may give better strength.
What you need to get started
- Expanding foam (standard gap-filling type)
- Utility knife with fresh blade
- Finishing filler and a flexible filling knife
- Fine sandpaper (120–240 grit) and a sanding block
- Masking tape and a dusting cloth
- Matching paint, mini roller and a small brush
- Gloves, goggles and ventilation for foam work
Why this is spreading now
Costs sharpen attention. People want fixes that look smart without sinking a weekend or a week’s food budget. Social media has amplified the foam-and-filler approach, but the principle comes from insulation and shopfitting: recreate the substrate, then layer cosmetics with restraint. As evenings draw in, this becomes a tidy, warm, indoor job that pays off immediately with a door that looks presentable again.
Extra pointers that raise the finish
Prime tricky surfaces
Some door skins resist paint. A light-drying primer can even out absorption and prevent glossy or dull patches. If in doubt, prime the whole panel for uniform sheen.
Colour-matching on a budget
No sample? Paint a small, hidden area and let it cure fully. Photograph in daylight and under warm light, then choose a shade that looks right in both. Many shops can tint small tester pots for a close match.
Safety, sustainability and renting
Wear gloves when handling foam, and keep windows open while it cures. Keep blades sharp to reduce slips. Dispose of empty cans responsibly; many recycling centres accept aerosol containers. Repairing a door rather than replacing it cuts waste and transport emissions, and it stops a usable leaf going to landfill.
If you rent, a tidy, colour-matched fix can prevent deposit deductions. Photograph damage before and after, keep receipts for materials, and tell your landlord you have restored the panel. For listed properties or doors with historical value, seek guidance before intervening.
A quick reckoner for your weekend
Set aside one evening: 15 minutes to prep and foam; later, 15 minutes to trim and first filler; next, 10 minutes to sand and a second pass; the following morning, a final sand and paint. By Sunday afternoon, the panel looks clean again. The figures are small—roughly £30 and under an hour of effort—but the lift in a room’s appearance feels far larger.


Tried this today—£18 foam + filler and honestly the hole vanished. Took me about 50 mins hands-on including sanding. Lifesaver for renters!
Is expanding foam really stable long-term? I’ve seen bulging months later when people overfill. Any data or is this just DIY anecdotel?