A surge of home makeovers has exposed the one line everyone notices: the boundary where two bold colours meet.
Across the UK, families are repainting rooms before winter and running into the same headache. The crisp divide between colours keeps slipping, even with careful hands. A low-cost method is racing through decorating forums and group chats, promising sharp lines with no tears or touch-ups.
Why crisp paint lines matter this season
Statement walls and split tones shape layout, mood and perceived size. A shaky seam between hues undermines those gains. Your eye snaps to the blur, not the scheme. Clean edges make saturated colours feel intentional. They also upgrade budget paint into something that looks specified.
The small flaw that steals the whole room
Bleed happens when paint creeps under tape or wicks along texture. It shows at eye level and across corners. It worsens on rough plaster and with heavy loads of paint. Rushing tape removal can lift the film and scuff the finish. Cheap masking tape also bonds too hard and tears fibres on dry removal.
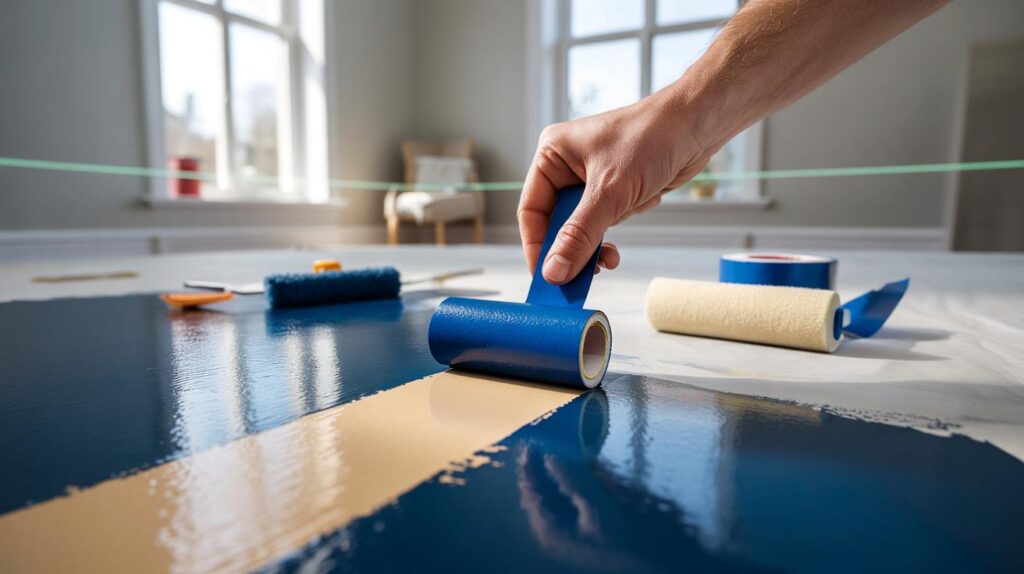
The method people are sharing: tape, pressure, seal, timing
Decorators point to four steps. Pick the right tape. Press it hard. Seal the edge. Pull it at the right moment. The approach takes minutes, not hours, and needs no specialist kit.
Choose the right tape for your surface and paint
Low-tack painter’s tape prevents damage to cured coats. Medium-tack suits matt emulsions on smooth walls. Film-backed edges help on very flat plaster. Slightly stretchy tape rides light texture better than paper alone. Check the “safe removal” window on the core. Many tapes list 14 days for interior use, but the pull happens far earlier.
| Tape type | Best for | Typical price per 25 m | Safe removal window |
|---|---|---|---|
| Standard masking | Dust sheets, non-critical protection | £2–£3 | 4–24 hours, may tear fibres |
| Low-tack painter’s | Freshly cured walls, delicate finishes | £4–£6 | Up to 14 days indoors |
| Film-backed edge | Very smooth plaster, laser-straight lines | £6–£9 | Up to 14 days indoors |
Lay the line precisely and seal it
Mark the boundary with a level or a laser. Run tape along the mark in one continuous pass. Overlap joints by at least 1 cm. Press the edge hard with a clean fingernail or a silicone scraper. The goal is full contact with no trapped dust.
Press, don’t just place: strong, even pressure along the edge blocks micro-infiltration.
Then lock the edge. Brush a thin bead of the first colour, or a clear matte varnish, along the tape line. Any seepage is now the colour you already have. Allow this light seal to reach touch-dry before the new colour goes on.
Seal the tape with the base colour to make bleed a non-event.
Apply paint with control, not excess
Load a small roller and roll away from the tape first. Finish with light strokes towards the tape at a shallow angle. Two thin coats beat one heavy coat for sharp boundaries. Cross-roll the second coat for an even film. Heavy, wet ridges near the tape encourage creep under the edge.
The timing that changes everything
This is where many DIY jobs falter. Waiting for full cure before pulling the tape sounds safe. It isn’t. Dried paint bridges the tape to the wall and tears when lifted.
Pull the tape while the paint is still fresh, ideally within 10–30 minutes of the final coat.
How to pull the tape without tearing the finish
Score any visible ridges with a light pass of a sharp blade if needed. Lift a corner and pull the tape back on itself at roughly 45 degrees to the line. Move slowly, about 5–10 cm per second. Keep the strip low to the surface to reduce lift. Bin the tape as you go to avoid smears.
Five-step checklist you can use today
- Prep the wall: wash, fill, sand and dust down for reliable adhesion.
- Mark a straight boundary with a level or laser and apply low-tack painter’s tape.
- Press the tape edge firmly and seal it with the existing wall colour.
- Roll on the new colour in thin coats, avoiding heavy build-up at the line.
- Pull the tape while the last coat is still fresh, at a steady 45-degree angle.
Costs, time and common pitfalls
A 25 m roll of decent painter’s tape costs about £4–£6 and covers a typical room perimeter. Sealing the edge adds five minutes per wall. Removing tape within the 10–30 minute window avoids an hour of razor work later. Heavy texture increases risk of bleed; a slightly elastic tape helps. Cheap beige masking tape can bond too hard and tear the new film during dry removal.
Humidity slows surface dry and widens the window. Warm, still rooms speed it up. Touch the paint in a spare spot to gauge freshness. It should feel soft, not tack-free. Gloss and satin stay workable longer than matt emulsions. Oil-based finishes need more patience but the same principle holds: pull before the bridge hardens.
Corners, ceilings and skirting boards
Internal corners hide slight deviation, but crooked lines show on tall walls. Use a laser to guide long runs over 2 m. At ceilings, choose a 3–5 mm reveal rather than chase a wavy plaster edge. Along skirting, tip the roller away from the timber to avoid flooding the joint. Where timber meets wall, a clear sealer line works well before the wall colour.
If you can’t tape, try the caulk line
On heavy texture, run a hairline of decorator’s caulk along a pencil mark and smooth it flat. Paint over it while fresh. It creates a physical barrier that resists wicking. Test on a small section first to confirm adhesion and a flat feather edge.
Planning colours and testing in real light
Split-tone schemes benefit from contrast with restraint. Deep blue against off-white sharpens corners. Sage beside warm grey softens shadows. Paint two A4 samples per colour on different walls and watch them at 9am, 1pm and 6pm. Light shifts reveal undertones that affect the contrast at your dividing line.
Practical extras you’ll be glad you knew
Keep a clean, dry cloth in your pocket to wipe dust from the tape edge as you lay it. Swap rollers after 8–10 square metres to avoid shedding fibres into the seam. Decant paint into a tray with a grid and get rid of excess before each pass. Measure your wall runs so you cut tape lengths that match, reducing joins where bleed can start.
For budgeting, a medium room with an 8 m feature wall usually needs 0.5–0.75 litres for two coats on the secondary colour. Add £6–£12 for tape and £3 for a silicone scraper. The line itself takes 20–30 minutes per wall when you follow the sequence. Plan the pull so you can reach the whole run without stopping; work from one end to the other and keep a steady motion.


I tried the “seal with the base colour then pull at 10–20 mins” trick this afternoon on a feature wall—night and day. Even over a slightly wavy ceiling line, the edge looks specified. Cost me £5 for tape and 25 mins per wall. Consider me converted.
Any1 else feel painter’s tape is overrated? I can cut in with a sash brush faster and cheaper. Does the clear varnish seal actually matter on matt emulsion, or is it just extra faff?