With colder evenings and fuller larders, kitchen energy waste creeps in silently. One silent culprit sits around your fridge door.
Across British homes, worn door seals are nudging bills up and shortening the life of fresh food. A cheap, quick fix exists, and it takes less time than a kettle descaling. Here is how households are cutting costs, tightening hygiene, and restoring chill using a five-step method that relies on a hairdryer and a steady hand.
Why this fix is trending before winter
Energy costs remain a pressure point for families. A tired fridge gasket leaks cold air and drags the compressor into longer cycles. That increases wear, noise and electricity use. Food spoils faster when temperatures yo-yo around dairy and cooked leftovers. A simple seal swap returns stability and makes a dent in running costs before the heating season bites.
Household trials show a per-appliance saving of 8–15% on annual fridge electricity when a faulty door seal is replaced.
In practical terms, a mid-sized fridge-freezer using 250 kWh a year could waste £20–£35 if the seal fails. Add food waste and nuisance defrosts, and the bill climbs further. A new gasket often costs less than a family takeaway and fits in under half an hour.
Spot the warning signs before food suffers
Clues you can check in under a minute
- Persistent condensation around the door rim or on glass shelves.
- A door that bounces or sticks instead of closing with a soft pull.
- Cracks, splits or flattening along the magnetic seal.
- Compressor cycling more often and running louder than usual.
- Ice edging near the freezer door frame or warm pockets in the fridge.
If a sheet of A4 slides out easily when the door is shut, the seal has lost grip and needs attention.
What you need and what it costs
Most brands sell model-specific gaskets. Universal options exist, but check the profile and magnet depth. A correct fit matters for hygiene and efficiency.
| Item | Typical price | Why it matters |
|---|---|---|
| Replacement door seal | £15–£45 | Matches the frame channel and magnet strength for a tight close. |
| Hairdryer | Free if you own one | Softens PVC or rubber so it seats evenly without strain. |
| Screwdriver | £3–£8 | Backs off inner-lip screws on many doors without removing the panel. |
| Microfibre cloth + soapy water | £0–£2 | Degreases the frame so the seal contacts clean metal or plastic. |
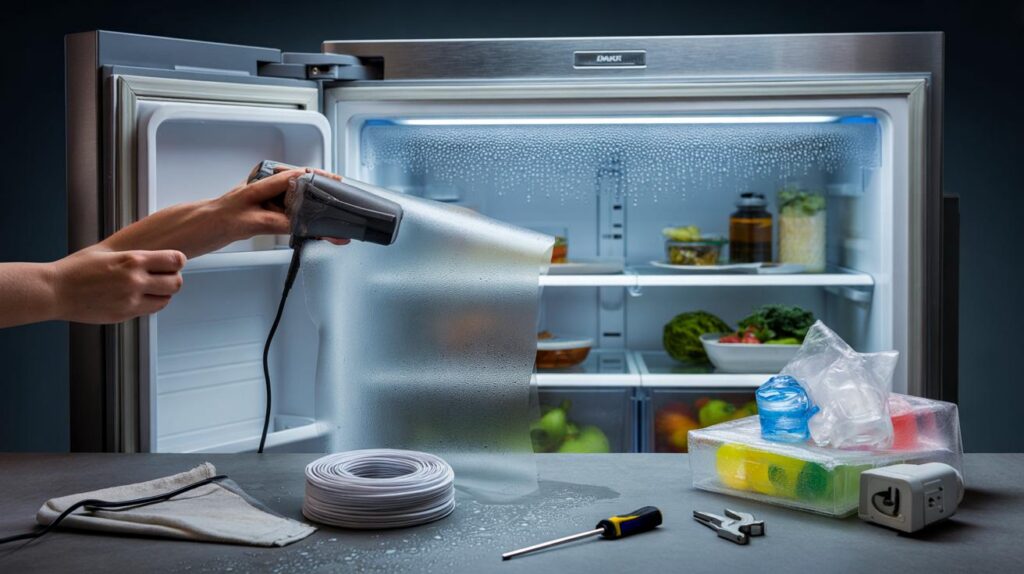
The 15-minute method engineers rarely share
Prepare the space and protect your food
Move perishables into a cool bag with ice packs. Switch off the appliance at the wall. Place a towel by the hinge to catch drips. Wipe the door frame groove with warm soapy water and dry it. Clean contact surfaces stop micro leaks and mould growth later.
Loosen, don’t strip, the inner screws
Open the door wide. On many models, small screws sit beneath the inner lip that grips the seal. Loosen them a quarter turn. Do not remove them. This releases the pinch on the old gasket without dismantling the door. Pull the old seal from its channel, starting at a corner to avoid tearing.
Warm the new seal so it relaxes
Hold a hairdryer 25–35 cm away. Use low heat and sweep along the gasket for 20–30 seconds per side. The goal is suppleness, not softness. Heat makes tight corners behave and reduces wrinkling around the hinge side.
The hairdryer step is the speed hack: gentle heat lets the magnet sit flush, locking in an even pressure all around.
Seat, press, and snug the screws
Offer the gasket to the top edge and work down both sides. Push the rib firmly into the channel with your thumbs. Aim for a consistent line with no twists. Nip the screws back until the lip grips the seal. Avoid over-tightening. Check the corners twice; they decide whether the door self-seals or rebounds.
Make sure it’s airtight and stays that way
Run two simple tests
- Paper test: close the door on an A4 sheet at four points. You should feel steady resistance when you pull.
- Fog check: after 10 minutes of running, look for mist at the frame. Clear plastic and a quiet compressor indicate a good seal.
If a section fails, warm that zone again and massage the lip into place. A second pass usually fixes minor waves.
Care tips that extend seal life
Habits that cut wear and silent leaks
- Wipe the gasket monthly with mild soap to remove fats and sugar residues.
- Do not overload the door shelves; excess weight twists the hinge and breaks contact.
- Teach children to guide the door closed rather than slam it.
- Check seal grip each season and after moving the appliance.
A clean, correctly aligned seal can add years to a compressor’s life and shave 20–40 kg of CO₂ per year from a home’s footprint.
When a DIY swap beats a service call
For most out-of-warranty units, a seal change is the cheapest intervention with the biggest payoff. A home visit can exceed £80 before parts. Doing it yourself often comes in under £35 with identical performance. If your door is warped or the hinge sags, adjust the hinge first, then judge the seal. Bent doors break even a perfect gasket.
Safety, compatibility and disposal
Stay safe while you work
- Unplug before loosening any screws near wiring or lights.
- Use low heat only; high heat can deform plastic liners.
- Keep fingers clear of magnets snapping into place.
Check the model label inside the fridge for the exact part code. If the original is discontinued, measure the groove depth and magnet width and match the profile. Take the old gasket to a parts counter for comparison if unsure. Recycle the worn seal at a household recycling centre; mixed plastics and embedded magnets do not belong in general waste.
Your numbers: what a family of four can save
A typical fridge-freezer in a family kitchen uses 0.6–0.9 kWh a day. A leaky seal can push that to 0.7–1.05 kWh. At 28p per kWh, that gap costs £28–£60 a year. Add three fewer bins of spoiled veg, dairy and leftovers, and you recoup the part price within weeks. Time investment: 15–30 minutes, once.
Extra insight for colder months
Food safety margins and winter behaviour
Cold air escapes faster when the door opens for school lunches and late-night snacks. A fresh seal recovers chill more quickly, keeping the 2–5°C zone stable. That slows bacterial growth and helps ready-to-eat foods hold quality longer. If frost reappears on the frame after a change, check the door alignment and level the feet so gravity aids closure.
Plan a mini audit while you’re there
Check the rear coils for dust and give them a soft brush. Confirm the door gasket sits flat near the hinge side, where twists hide. If the interior light stays on when the door closes, adjust the switch; that alone adds heat and mimics a weak seal. Small checks stack into reliable performance through the cold season.


Did this on my Samsung—took ~15 mins and the compressor calmed right down. Briliant, thx for the step-by-step.