A tiny scratch can feel huge when it catches the light on a Monday commute, and wallets flinch before drivers do.
Across Britain, drivers face a seasonal surge in scuffs as wet roads and fallen branches mark tired paint. A quiet shift is under way: motorists are swapping pricey bookings for cupboard staples and smart technique, squeezing real value out of simple fixes that don’t take all afternoon.
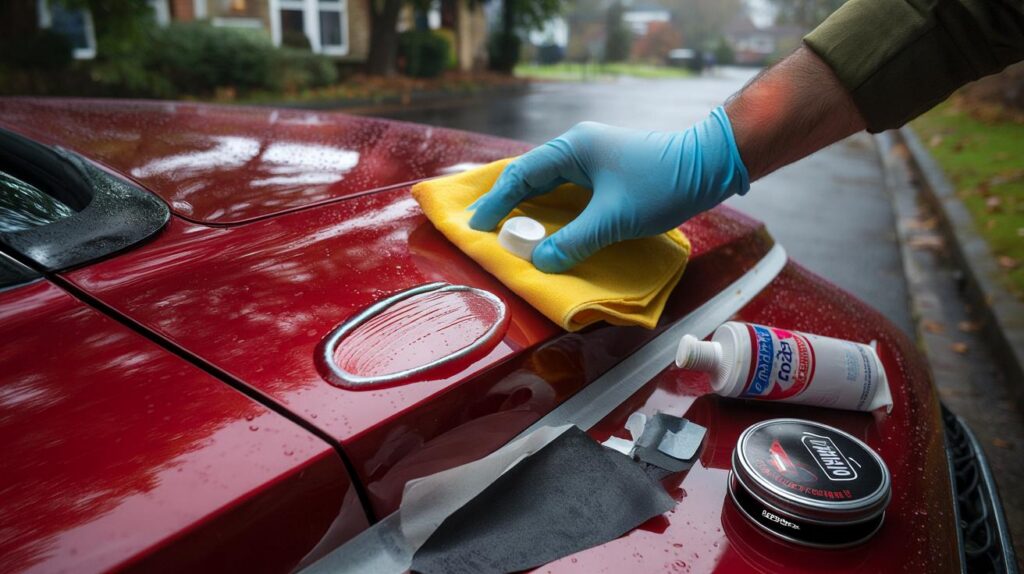
Why drivers are turning to a £6 fix
Light paint correction at a body shop can run £80–£150 for a single panel, and a respray often starts near £250. Waiting lists stretch for weeks in busy towns. Budget-minded owners are instead reaching for a microfibre, a tube of plain white toothpaste, and patience. The outlay sits around £6 if you already own a cloth. The payoff is immediate on shallow marks.
For faint, surface-only scratches, a soft cloth and a pea of white toothpaste can buy you 12 minutes and a visibly cleaner finish.
The trick works because many everyday products contain fine abrasives or oils that fill or round off the edges of a scratch. That softens the way light reflects, so marks become harder to see. The key is to test, start mildly, and stop early.
How to tell if a scratch will respond to diy
Not every blemish sits in the same layer of paint. Knowing which you have avoids wasted effort and fresh damage.
The fingernail test
Run a clean fingernail lightly across the mark. If the nail does not catch, the blemish sits in the clearcoat and often buffs out. If the nail catches, the scratch cuts deeper and needs compound or touch-up paint. If you see bare metal or plastic, do not abrade it; seal it quickly to block corrosion.
Wet the panel and watch. If the mark nearly vanishes under water, it is likely a clearcoat problem. Water mimics the effect of filler oils and waxes, so this is a good sign for a simple remedy.
Step-by-step: the quick 12-minute method
- Wash the area with car shampoo and water. Rinse and dry with a clean microfibre.
- Mask rubber trims and badges with low-tack tape to keep residue off them.
- Dot a pea-sized amount of plain, non-gel white toothpaste onto a soft microfibre.
- Work the mark with light, circular motions for 30–40 seconds. Keep pressure gentle.
- Wipe, inspect under good light, and repeat once or twice if needed. Stop if gloss fades.
- Finish with a thin coat of wax or sealant to restore protection and shine.
Work clean, work small, and reassess often. The gloss you keep is as valuable as the scratch you reduce.
Household stand-ins that actually work
Several pantry or garage items can soften micro-marring and light scuffs when used with care.
| Method | Typical cost | Time | Best for | Caution |
|---|---|---|---|---|
| White toothpaste (non-gel) | £1–£3 | 5–12 mins | Clearcoat scuffs and transfer | Test first; stop if hazing appears |
| Baking soda paste (with water) | £1 | 6–10 mins | Micro-swirls, light key marks | Use a fine paste; avoid gritty mixes |
| Cigarette ash, slightly damp | Low | 5–8 mins | Very faint hairline marks | Keep residue away from crevices |
| WD‑40 mist, wipe off | £4–£6 | 2–3 mins | Colour revival and temporary masking | Short-lived; may strip wax; avoid brakes |
| Light oil, furniture wax, or petroleum jelly | £2–£6 | 3–5 mins | Fast cosmetic fill on shallow lines | Can attract dust; clean and re-wax later |
These fixes do not repair gouges. They soften edges and fill valleys so the eye stops catching on them. Do not use them on matte paint or satin vinyl, which can stain or turn glossy.
Start with the least abrasive product you own. You can always step up, but you cannot put clearcoat back.
When to move up to polish and touch-up paint
If the scratch catches a nail or the simple pass leaves it obvious, reach for an automotive polish. A diminishing abrasive compound with a foam applicator levels the top of the clearcoat in a controlled way. Work in small sections. Wipe often. Keep heat down. A hand polish takes longer but gives you more control than a machine for a first attempt.
If you see primer, plastic, or metal, a touch-up kit becomes the smarter route. Clean, degrease, and dab colour only into the cut, then finish with clear lacquer once it flashes off. Let layers cure per the instructions. Flatten nibs with a tiny drop of compound, then seal with wax after curing.
Colour codes and clearcoat
Find the exact colour code on the driver’s door jamb, under the bonnet, or in your manual. A near match can stand out more than the original scratch. Most modern cars use a basecoat plus a clearcoat. The clear layer gives gloss and UV resistance. Keep correction shallow, because you only have so much clear to work with.
Pitfalls that cost you money
- Rubbing a dirty panel grinds grit into the clearcoat and adds swirls.
- Working in direct sun dries products early and leaves haze.
- Using a harsh pad or too much pressure flattens gloss fast.
- Skipping protection means the repaired patch oxidises more quickly.
- Spraying lubricants near pads or discs risks braking performance.
How the costs stack up this autumn
For a light clearcoat scratch, a £6 home session can make a 60–80% visual improvement in under 15 minutes. A similar cosmetic uplift at a shop often sits near £100 once you factor in labour and a booking. Deeper cuts change the sums. A compound and pad set costs £12–£25 and covers many panels over months. A touch‑up pen costs £12–£20 and solves stone chips and sharp key lines. A panel respray holds best on large scars but often exceeds £250, with downtime added.
Insurance rarely helps for minor marks once excess and premium hikes enter the equation. Many motorists eat the cost themselves and keep the claim history clean. That calculus favours DIY for light defects, targeted touch-ups for deeper ones, and professional work for creases, dents, or paint failure.
Care after the fix and quick wins to prevent new marks
Seal any corrected area with a wax or a spray sealant. A thin sacrificial layer makes washing safer and slows UV fade. Repeat protection every 6–8 weeks through winter, when salt and grit attack faster. Use the two-bucket wash method and a grit guard to keep dirt away from your mitt.
Small habits reduce risk. Park a bay away from trolley lines. Fold mirrors on tight streets. Rinse salt quickly after long motorway runs. Fit temporary film on high-risk zones like door edges, sills, and the boot lip. A £10 edge guard can save a £200 respray.
Extra notes for curious hands
Clearcoat thickness varies by make and age. Many cars carry 80–140 microns of total paint build, with only a fraction as clear. A single careful polish may remove 1–2 microns. That is why restraint matters. If you plan regular correction, invest in a mild finishing polish and save cutting compound for real defects.
If you enjoy the process, time a home test: mask a 10 cm square, correct half, and photograph both sides in the same light. You will learn how much pressure and product you need and how many passes your paint tolerates. That knowledge pays back across every panel you touch.
Test in a discreet spot, fix only what you see, and protect the finish you have. That is the professional mindset at home.


Tried the fingernail test and toothpaste on a shallow scuff—12 minutes later it’s 70% better and the gloss is intact. Followed with wax as you said. This is the first “£6 fix” that actually worked for me. Cheers! 🙂
Cigarette ash on paint makes me nervous—won’t the grit act like sandpaper? Sounds a bit sketchy, even with “slightly damp”. Anyone got real-world results, or is this just one of those old garage myths?