Across Britain, a humble bathroom staple is finding its way back to sideboards and dressers, calming nerves about scuffed heirlooms.
A tin of shoe polish, once routine on every hallway shelf, is suddenly the talk of repair groups and house-proud families. Videos show quick turnarounds. Owners say the trick masks light scratches on dark finishes in minutes. The method costs less than a takeaway coffee and needs little skill. Curators and restorers weigh in with caveats, while households try it on everything from mahogany chests to walnut bureaux.
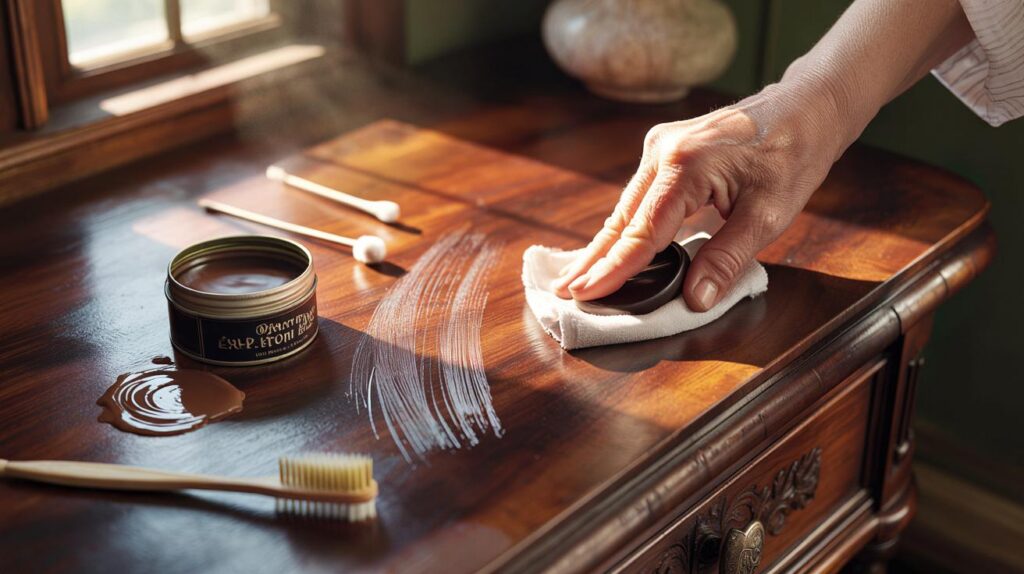
Why a shoe polish tin is in the spotlight
The fuss centres on an old-fashioned move: rub coloured wax into a scratch, wait, then buff. The aim is not to rebuild missing timber. The goal is to disguise pale scratch lines that catch the light. Pigment tints the scar. Wax fills tiny grooves and changes how the surface reflects. Owners report strong results on darker woods. Many say the quick routine fixes nine in ten superficial marks.
Five minutes, one soft cloth, and a £3 tin can mute most light scratches on dark-finished furniture.
The approach suits day-to-day maintenance. It also buys time before calling a professional. On heritage pieces, experts still advise restraint. A careful patch test protects value and finish.
What you need
- Shoe polish that matches or sits just darker than the furniture finish
- Two soft cotton cloths: one for application, one for buffing
- Cotton buds for thin, precise scratches
- A clean, soft toothbrush for carved details and edges
- Nitrile gloves and ventilation if you react to polish solvents
Colour match matters. A shade too dark usually hides better than a shade too light. Neutral polish suits oiled pieces, while pigmented polish works on stained and varnished timber.
How the 5-minute method works
Step-by-step, at a glance
- Wipe dust away with a barely damp cloth and let the area dry for five minutes.
- Warm a pea-sized amount of polish between fingers for ten seconds.
- Work the polish over the scratch in tight circles for thirty seconds.
- Use a cotton bud along the grain to push wax into the line.
- Leave it for two minutes so wax can settle without hardening fully.
- Buff briskly with a clean cloth until the sheen looks even.
Work small. Aim for the scratch and a small halo around it. Stop once the line blends. Excess wax can smear and attract dust.
Test on a hidden corner first, check the colour in daylight, and build tone in thin layers rather than one heavy hit.
What the science says
Shoe polish blends waxes, oils and pigments. Waxes fill micro-scratches and reduce contrast. Pigments tint raw fibres exposed by the scratch. Oils help flow and spread. The blend alters the refractive index at the damage line, so the eye reads a continuous surface. The wood does not heal. The finish only looks more uniform. Regular dusting and gentle buffing help the effect hold between top-ups.
Picking the right colour
| Wood tone | Polish colour | Suitability |
|---|---|---|
| Mahogany, sapele | Dark brown or oxblood | High. Tones blend well on stained surfaces. |
| Walnut | Medium to dark brown | High. Use thin coats for control. |
| Cherry | Warm brown | Good. Avoid black, which can dull warmth. |
| Oak, ash (light) | Neutral wax, lightly tinted | Moderate. Risk of visible dark patches. |
If you lack the exact shade, mix a touch of coffee grounds with neutral wax and trial it on the back of a leg. A soft artists’ pastel can also tint neutral wax on the fly.
Results, costs and how long it lasts
A small tin costs roughly £3 to £6 and lasts for dozens of patches. One scratch takes three to five minutes to treat. Most light marks vanish or fade to near invisibility after one pass. The finish usually holds for three to six months under normal dusting. Busy surfaces, such as dining tables, may need a light top-up sooner. Owners of showpieces often schedule a quarterly polish alongside routine care.
Expect diminishing returns on deep gouges, edge chips and raw, greyed timber. These need filler, stain and a protective topcoat. You can still improve them with the wax trick while you plan a fuller repair.
For deeper gouges and tricky finishes
Layering for depth
Apply two or three thin coats rather than a single thick one. Buff lightly between coats to judge progress. Warm the wax in your palm to help it flow into fibres. A hairdryer on a low setting can soften wax on carved mouldings, but keep it moving to avoid heat marks.
Finishes to handle with care
- French-polished shells and high-gloss polyester: wax can smear the shine and highlight swirls.
- Raw or newly sanded wood: pigment can stain the surrounding grain unevenly.
- Light maple or bleached oak: dark wax can look muddy and obvious.
- Laminates and veneers with printed grain: use furniture pens designed for synthetics.
When to skip the hack
White heat rings point to moisture under the finish. A gentle heat-and-cloth trick often works better than wax for that. Sun-faded tops show wide, pale fields. These need stain and a sealing finish. Loose or lifting veneer requires adhesive, clamping and a careful clean-up, not polish.
Safety, value and care
Shoe polish contains solvents. Work with a window open and keep away from naked flames. Seal used cloths in a metal tin and bin them once dry. Avoid silicone-heavy products near pieces you may refinish later, as silicone can cause fish-eyes in new varnish.
If you care about resale value, keep a log of any interventions. Photograph before and after. On high-value antiques, test on a removable part such as a drawer back. A conservator can advise on reversibility and period-appropriate materials.
Alternatives if you lack polish
- Walnut kernel: rub the nut over a light scratch to deposit natural oils and colour.
- Wax crayons: melt a matching crayon into the scratch, level with a plastic card, then buff.
- Touch-up pens: run along the grain, wipe fast before it dries, and seal with neutral wax.
- Beeswax balm: mix a touch of artists’ pigment into clear balm for a custom tint.
What a pro would check first
A restorer looks at the finish type, the depth of damage and the wood species. They match sheen levels so the repaired spot does not stand out in raking light. They assess movement in joints, which can re-open cracks. They plan for seasonal expansion, so fillers do not pop out in winter. The same checks help any homeowner decide how far to go with a quick fix.
Extra guidance for better odds
Work with daylight falling across the scratch from the side. This angle shows when the line stops catching the light. Keep products off fabric trims and leather tops, which stain fast. Do not chase perfection on the first pass. Aim for less contrast and an even sheen. Return a day later if you want a touch more tone.
Try this small drill to practise control. Take a spare frame or a hidden panel. Make a light scuff with a key. Treat one half with neutral wax and the other with a tinted wax. Compare in daylight and under a warm bulb. You will see how colour and sheen play together. That short exercise brings confidence before you touch a family piece.


Just tried this on my walnut sideboard—five minutes, dark brown polish, and the scratch basically vanished 🙂 Biggest tip: go a shade darker and buff longer than you think.
Isn’t shoe polish loaded with solvents that could haze French polish? Kinda worried about long-term build-up—anyone seen residue attracting dust over time, or am I being over-cautios?